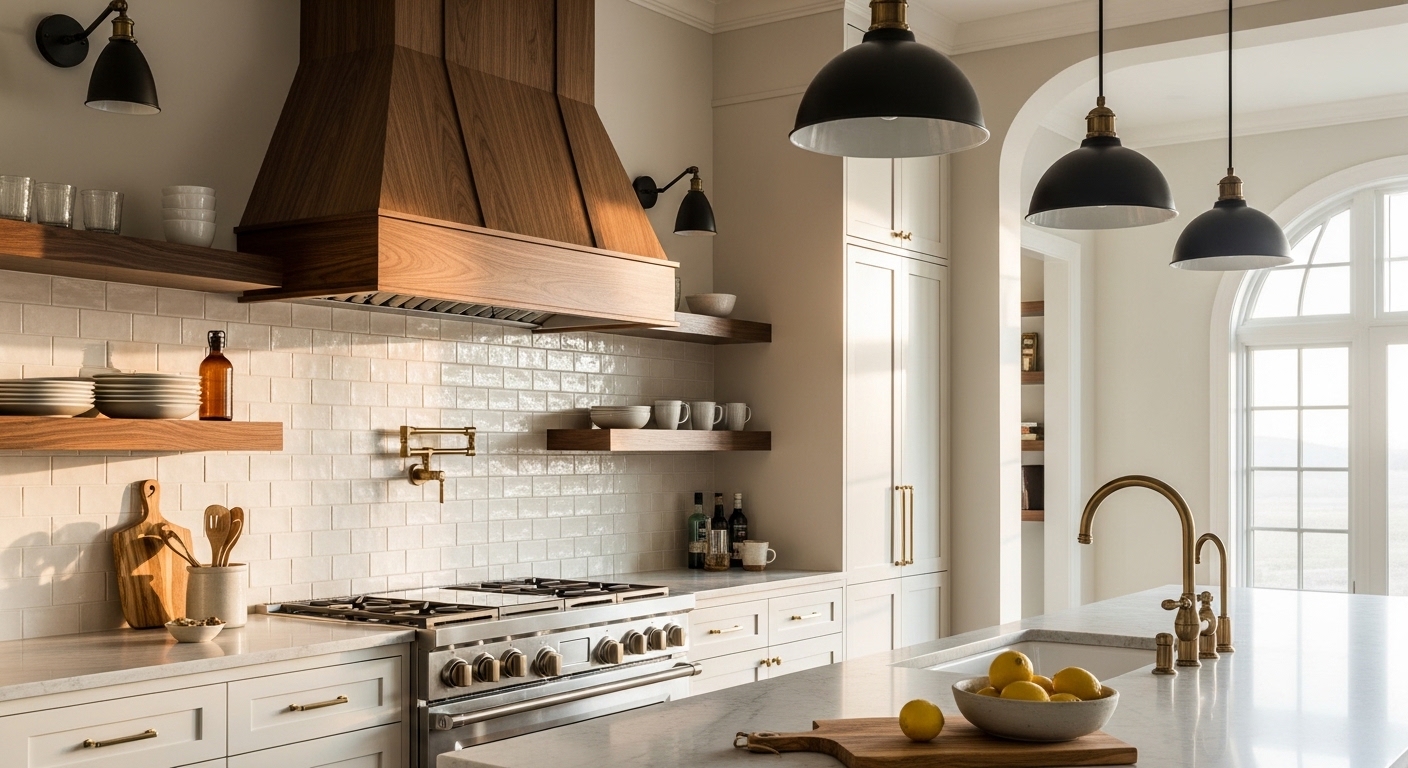

There’s something about a wood range hood that makes a kitchen feel like it actually belongs to someone. Not a showroom. Not a catalog page. A real home where someone cooks, gathers, and lives. It’s that kind of quiet beauty that stops you mid-scroll.
If you’ve been staring at your kitchen thinking it needs something — some anchor piece that ties the whole room together — you’re probably closer to the answer than you think. A wood hood kitchen setup does exactly that. It pulls your eye up, grounds the space, and adds a texture that no amount of tile or paint can replicate.
Below, you’ll find 17 genuinely different wood hood ideas spanning every style from raw and rustic to sleek and barely-there modern. Each one stands on its own, so jump to whatever catches your eye first.
1. Reclaimed Barn Wood Hood With Visible Grain Patterns
Old barn wood carries decades of weather, sun, and character in every plank. A range hood built from reclaimed boards gives your kitchen an instant story — one you didn’t have to wait years to earn. The knots, nail holes, and uneven tones do all the design work for you.
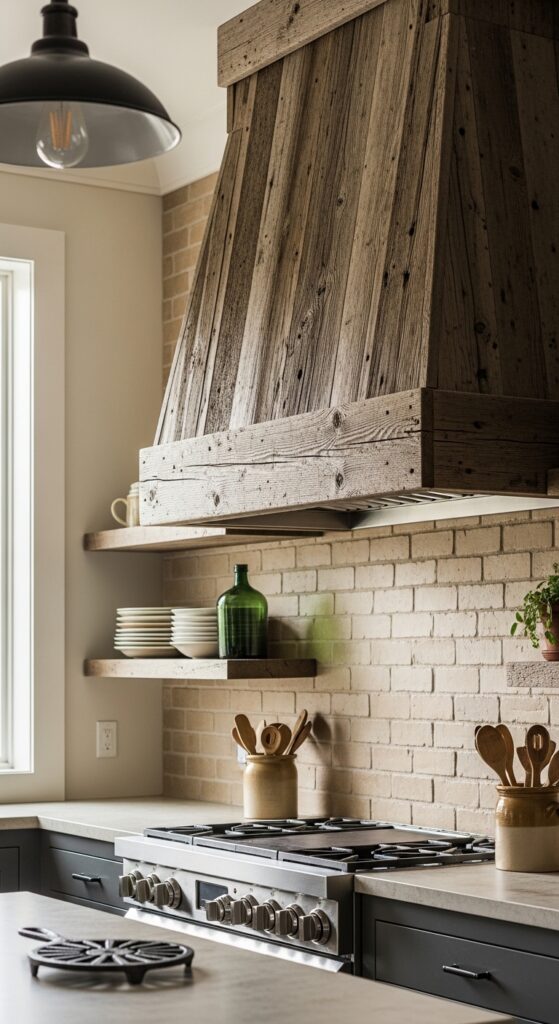
Be realistic though — reclaimed wood needs proper sealing to handle kitchen grease and moisture. Some pieces may warp over time if not treated correctly, and sourcing quality barn wood isn’t always cheap or easy depending on your area.
Aged wood tells a better story than anything you could buy new.
Here’s what helps you nail this look:
- Rustic Reclaimed Wood Wall Planks — Cover your hood surround with authentic weathered texture for an instant aged look.
- Heavy-Duty Ventilation Insert Kit — Keep airflow strong behind your wood hood with a reliable insert built for daily cooking.
- Natural Beeswax Wood Finish Sealant — Protect your reclaimed wood’s character while shielding it from kitchen grease and steam.
2. White Oak Shaker-Style Range Hood
White oak brings a calm, golden warmth that pairs beautifully with shaker-style paneling. This hood feels classic without being fussy — clean lines, flat panels, and a natural grain that doesn’t compete with the rest of your kitchen. It’s the kind of design that works in a farmhouse or a modern colonial without skipping a beat.
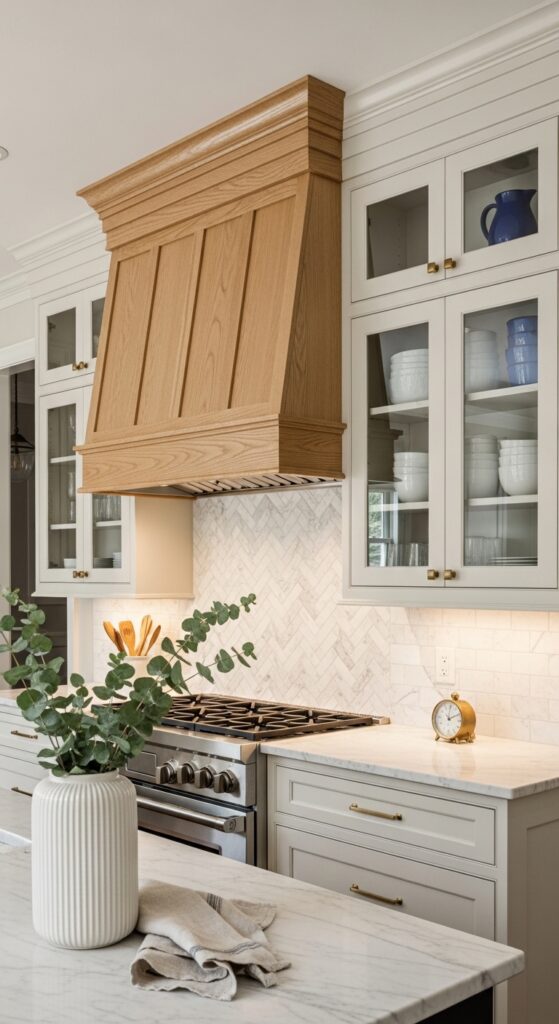
Worth knowing — white oak darkens slightly with age and light exposure, so the tone you see at install won’t be the exact tone five years in. That’s not a flaw, though. Most homeowners end up loving the deeper honey shade it develops.
Simple lines and honest wood make a kitchen feel finished, not decorated.
A few picks to get you started:
- Shaker Panel Range Hood Shell — Give your kitchen that timeless flat-panel profile with a hood ready for your custom finish.
- Matte Brass Cup Pull Hardware — Tie your shaker hood into the rest of your cabinetry with warm, low-shine brass pulls.
- Satin Polyurethane Clear Coat Spray — Lock in your white oak’s natural beauty while adding a smooth, wipeable surface.
3. Curved Plaster-and-Wood Hybrid Hood
Picture a soft, rounded plaster hood with a thick wood trim band wrapping the bottom edge. This mix of smooth and textured, hard and organic, creates a look that feels collected and European — like it came together over time rather than from a single order. The wood band anchors the plaster’s softness and gives your eye a place to rest.
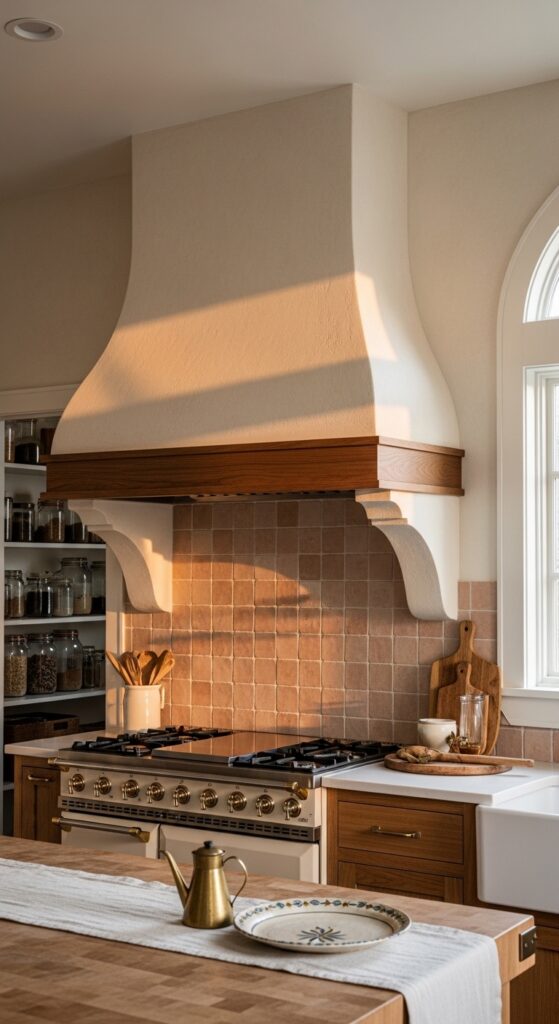
One thing to watch — getting the plaster curve smooth takes a skilled installer. DIY attempts often end up lumpy or cracked. Budget for a professional plasterer, and make sure the wood trim gets installed after the plaster fully cures.
Mixing materials makes a kitchen feel discovered, not designed.
These will help bring it together:
- Smooth Venetian Plaster Finishing Kit — Create that hand-troweled European texture over your hood frame with a ready-to-mix kit.
- Thick-Cut Walnut Trim Molding Strip — Add a rich, dark wood band to contrast against light plaster for a collected feel.
- Flexible LED Under-Hood Strip Light — Tuck warm lighting beneath the trim line to highlight the plaster curve at night.
4. Tongue-and-Groove Cedar Vent Hood
Cedar’s reddish tone and fine, straight grain bring a warmth that reads slightly Pacific Northwest, slightly cabin, and entirely inviting. Tongue-and-groove planking on a hood creates subtle shadow lines that add depth without busyness. Plus, cedar is naturally resistant to moisture and insects — a practical bonus in a kitchen setting.
Fair warning — cedar’s scent is strong when freshly cut and installed. It fades within a few weeks, but if you’re sensitive to strong wood smells, plan your install during a season when you can keep windows open. The color also shifts toward silver-gray without a UV-protective finish.
Cedar doesn’t just look warm — it makes your whole kitchen smell like a forest for a while.
Solid options to pull this off:
- Aromatic Cedar Tongue-and-Groove Planks — Build your hood cladding with tight-fitting, fragrant cedar boards that naturally resist moisture.
- UV-Protective Wood Oil Finish — Prevent your cedar from graying by applying a clear oil that blocks light damage.
- Stainless Steel Baffle Filter Set — Keep grease away from your cedar planks with commercial-grade filters that clean up easily.
5. Black Walnut Waterfall Hood With Bookmatched Panels
Bookmatched walnut — where two slabs are opened like a book to mirror the grain — is one of the most striking things you can do with wood. On a range hood, it becomes a genuine art piece. The dark chocolate tones and flowing grain patterns give your kitchen a focal point that rivals any backsplash or light fixture.

Straight talk here — bookmatched walnut slabs from a reputable mill aren’t cheap, and they need careful handling to prevent cracking during install. You’ll also want a cabinetmaker who’s worked with live-edge or slab wood before. This isn’t an IKEA hack.
Bookmatched walnut is furniture-grade drama that happens to vent your stove.
Here’s what makes it happen:
- Premium Bookmatched Walnut Slab Pair — Start with a perfectly mirrored set of walnut slabs cut for symmetrical hood paneling.
- High-CFM Quiet Range Hood Insert — Pair serious ventilation power with your walnut panels without rattling the whole kitchen.
- Danish Oil Dark Walnut Wood Feed — Bring out the deepest chocolate tones in your walnut while nourishing the grain.
6. Whitewashed Pine Cottage-Style Hood
Whitewashing pine gives you all the grain texture with a softer, beachy lightness. This hood style is perfect for cottage kitchens, coastal spaces, or anyone who wants wood warmth without the heaviness of dark stains. The white pigment sits in the grain lines while the raised wood stays lighter, creating a subtle two-tone effect.
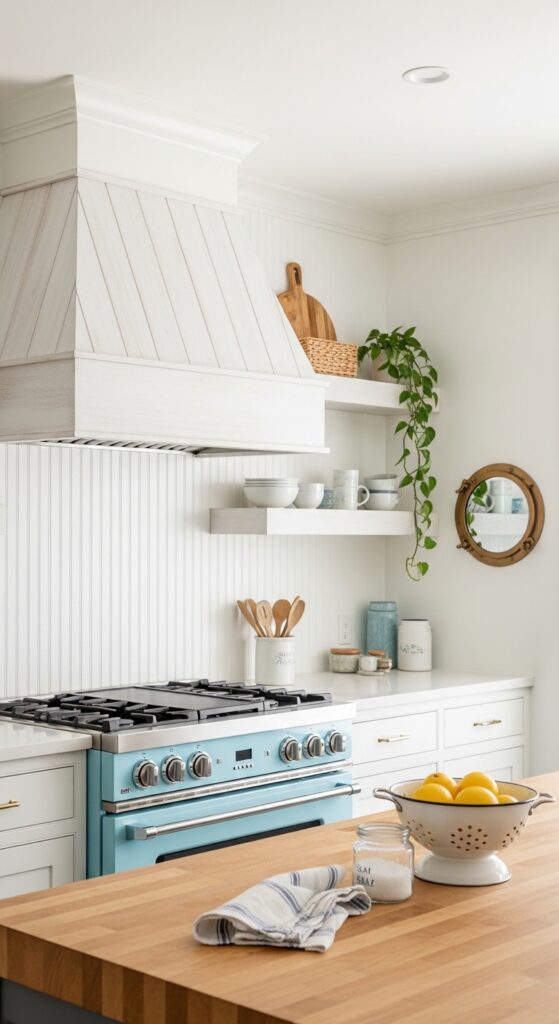
Keep this in mind — whitewash finishes can look uneven if you rush the application. You need to wipe consistently and work in small sections. Pine is also a soft wood that dents easily, so your hood will pick up character marks over the years. Most cottage-style lovers consider that a feature, not a problem.
Light, soft, and imperfect — exactly how a cottage kitchen should feel.
Grab these to get going:
- Knotty Pine Tongue-and-Groove Boards — Build a charming, textured hood surface with affordable pine that takes whitewash beautifully.
- Water-Based Whitewash Wood Stain — Apply a milky, translucent coat that lets pine’s natural grain peek through.
- Woven Seagrass Pendant Light Fixture — Hang a textured light nearby to complement the coastal, relaxed vibe of your whitewashed hood.
7. Rift-Sawn Oak Minimalist Floating Hood
Rift-sawn oak has an incredibly clean, linear grain pattern — no cathedral arches, no wild swirls. Just straight, quiet lines that make a floating hood look like a piece of Scandinavian furniture mounted to your wall. The lack of visual noise in the wood lets the shape of the hood do the talking.
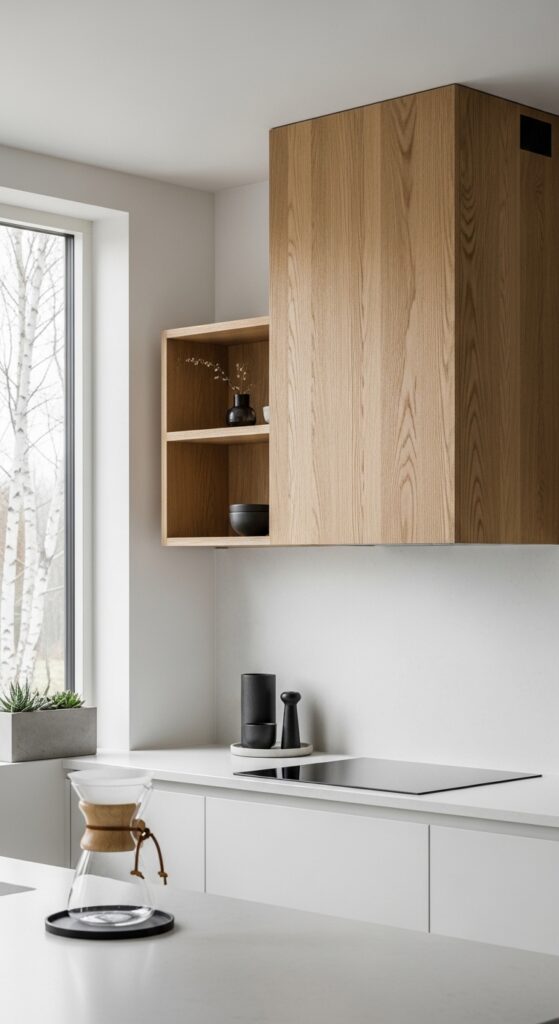
Practical note though — a floating hood design means all your ductwork needs to be concealed inside the wall or ceiling above. That requires planning during a remodel, not after. Retrofitting a floating look into an existing kitchen often means opening up walls, which adds cost and timeline.
When the wood is this quiet, the shape becomes everything.
These fit the look perfectly:
- Rift-Sawn White Oak Veneer Sheets — Wrap your hood body in clean, straight-grain oak without the weight of solid planks.
- Concealed Wall-Mount Hood Bracket System — Give your hood that true floating appearance with hidden steel brackets rated for the weight.
- Matte White Ceramic Subway Tile Pack — Pair your oak hood with crisp, simple tile that lets the wood stay the star.
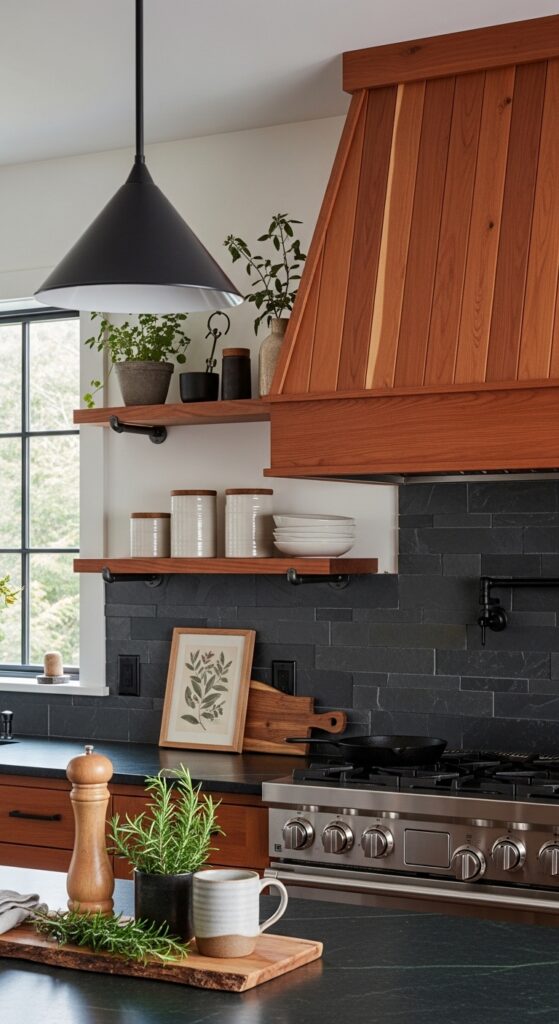
8. Herringbone Wood Panel Hood Surround
Taking wood planks and arranging them in a herringbone or chevron pattern on your hood turns a simple material into a geometric statement. The angled lines draw the eye upward and add a sense of movement that flat planks can’t match. It works especially well in transitional kitchens that blend traditional and contemporary elements.
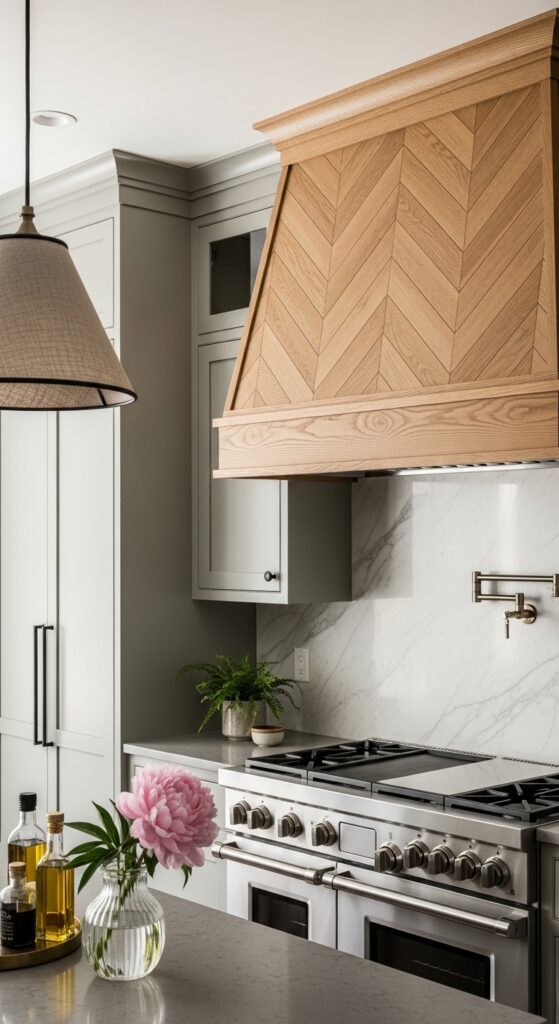
Real talk — herringbone installation on a hood requires precise angle cuts and a skilled carpenter. Every piece needs to align perfectly, or the pattern looks off. Expect to pay more for labor than a standard plank hood, and order extra material because the angled cuts create more waste.
Herringbone turns ordinary planks into a pattern your eyes can’t stop following.
Here’s what you’ll need:
- Pre-Cut Herringbone Wood Tile Panels — Save yourself the angle-cutting headache with panels already cut to the correct chevron pattern.
- Wood-Tone Flexible Caulk Tube — Fill small gaps between herringbone joints with a color-matched caulk that disappears.
- Integrated Range Hood Light Bar — Illuminate your herringbone pattern from below to show off the shadow play at every angle.
9. Live-Edge Slab Mantel Over a Plaster Hood
Forget a full wood hood — sometimes one statement piece is enough. A single live-edge slab mounted as a mantel shelf over a plaster or drywall hood brings raw, organic beauty without overwhelming the space. The irregular edge and bark remnants create contrast against the smooth hood behind it.
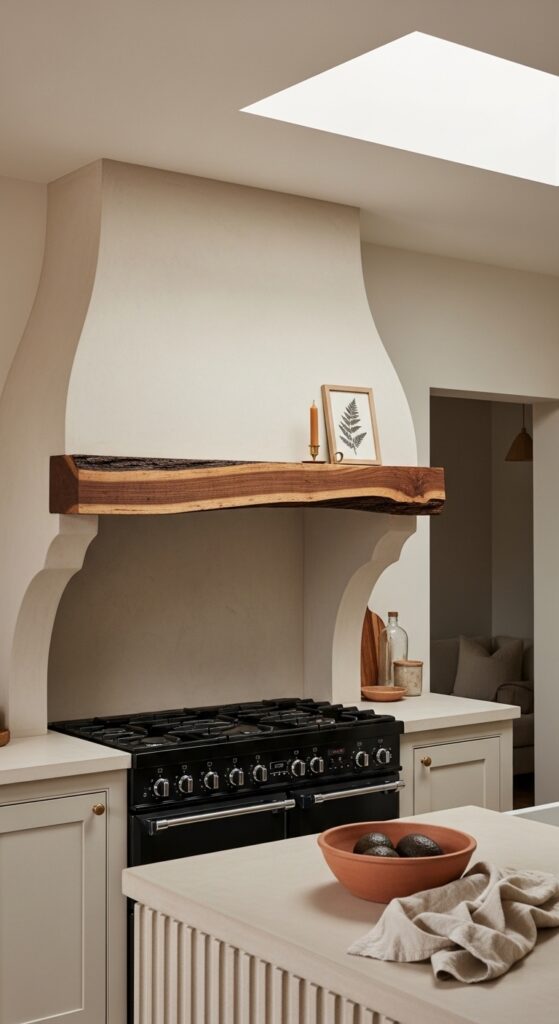
Something to consider — live-edge slabs with bark still attached need stabilizing resin or the bark will eventually loosen and fall off. Also, make sure the slab is thick enough to not sag over the span. Anything wider than 36 inches needs solid bracket support behind it.
One raw edge can do what a full renovation can’t — make a kitchen feel alive.
These make the difference:
- Kiln-Dried Live-Edge Floating Shelf Slab — Mount a genuine bark-edge slab above your hood for a one-of-a-kind organic mantel.
- Hidden Heavy-Duty Floating Shelf Brackets — Support your thick slab invisibly with steel brackets rated for real weight.
- Clear Epoxy Bark-Edge Stabilizer Resin — Lock the live bark in place permanently so it won’t chip or peel over time.


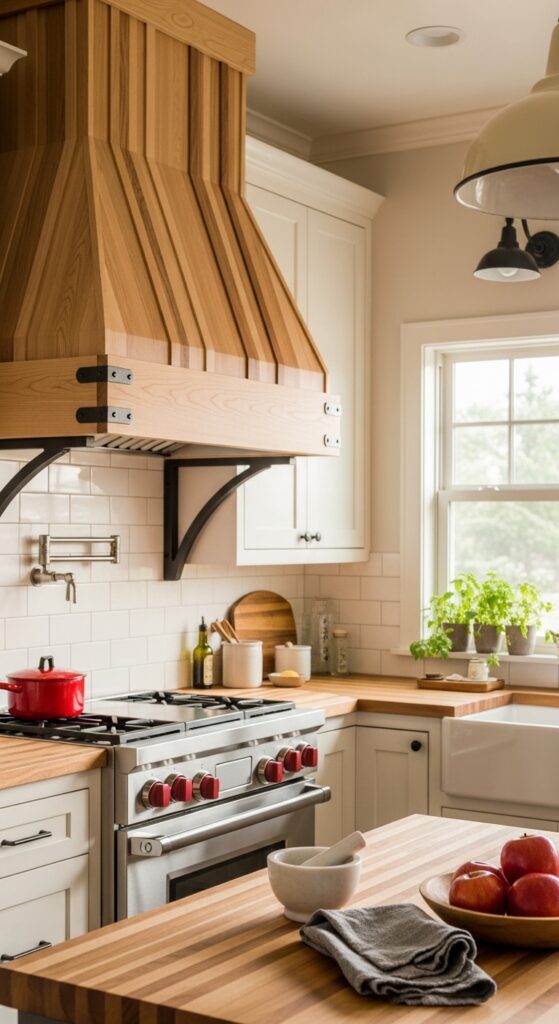
10. Alder Wood Craftsman-Style Tapered Hood
Alder is the unsung hero of kitchen woodwork — it’s lighter than oak, accepts stain beautifully, and has a subtle grain that doesn’t fight other design elements. A tapered hood with corbel supports in alder gives you that arts-and-crafts, Craftsman bungalow feel. It’s detailed without being ornate.
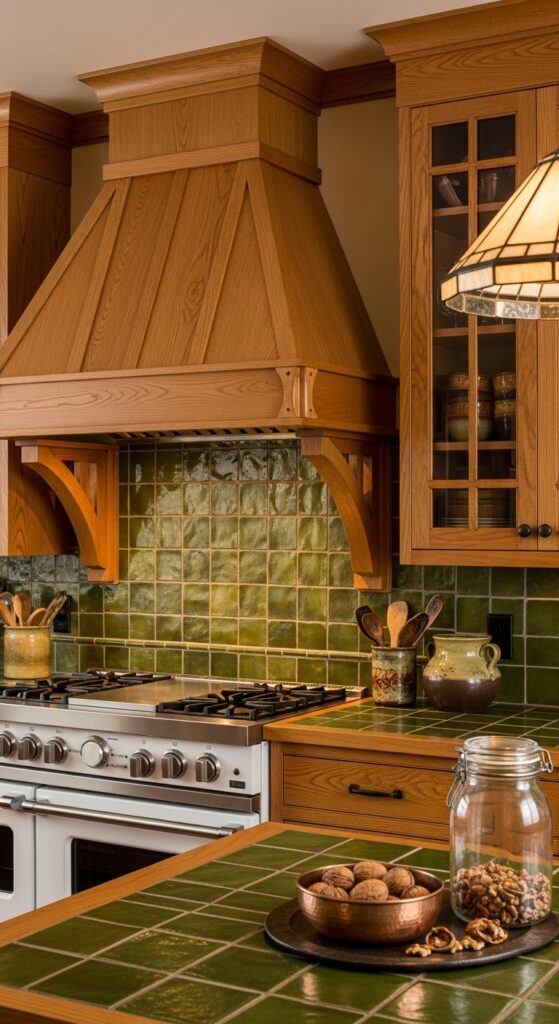
Just so you know — alder is softer than many hardwoods, so it can dent more easily if something bumps the hood. It also darkens quite a bit when stained, so always test your stain on a scrap piece first. The final color may surprise you compared to how the raw wood looked.
Craftsman details prove you don’t need ornament to have character.
Pull it together with these:
- Knotty Alder Range Hood Shell Kit — Start with a ready-to-finish alder hood body that takes stain like a dream.
- Decorative Wood Corbel Support Brackets — Add authentic Craftsman-era support details under your hood’s tapered sides.
- Gel Stain Medium Walnut Wood Finish — Get a rich, even color on alder’s sometimes blotchy grain with a thick gel formula.
11. Charred Shou Sugi Ban Wood Hood Panels
The Japanese technique of charring wood creates a blackened, crackled surface that’s both beautiful and remarkably durable. Shou sugi ban on a range hood is unexpected and dramatic — it reads as dark and moody without relying on paint or dark stain. The charred texture catches light in ways that flat finishes simply can’t.
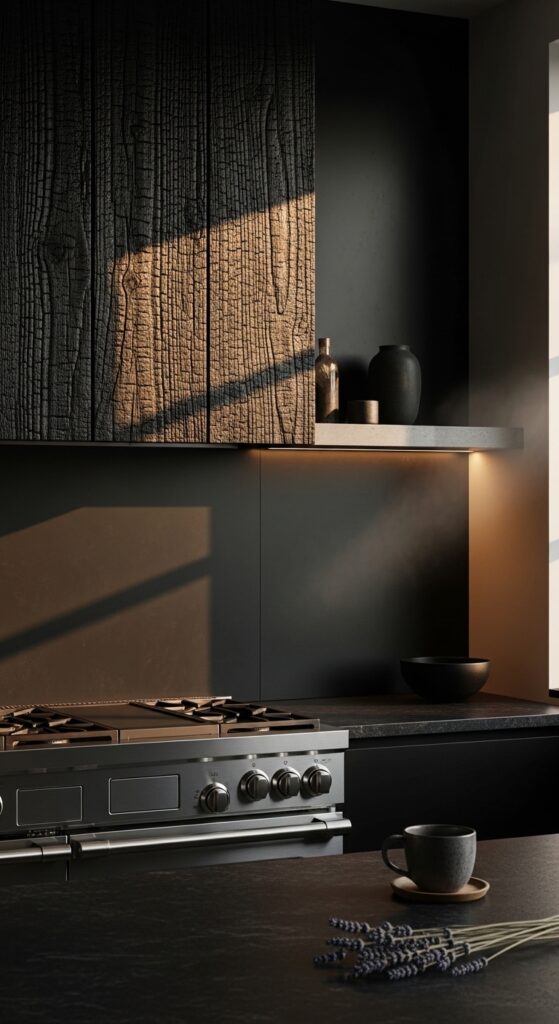
Be prepared though — the charring process creates a lot of smoke and needs to happen outdoors. Pre-charred panels are available online, but they’re pricier than DIY. The surface also sheds tiny carbon particles initially, so you’ll want to seal it thoroughly and expect some dust during the first few weeks.
Fire made this wood stronger and more beautiful — there’s a lesson in that.
Get it done with these:
- Pre-Charred Shou Sugi Ban Cedar Panels — Skip the torch work and start with professionally charred panels ready for installation.
- Matte Black Range Hood Insert Liner — Match your charred wood with a sleek black insert that disappears into the design.
- Penetrating Tung Oil Natural Sealant — Seal your charred panels without adding sheen so the matte, textured look stays intact.
12. Maple and Brass Trim Contemporary Hood
Light maple with thin brass inlay strips or a brass trim band creates a modern, upscale look that feels intentional and polished. The pale wood keeps things bright while the warm metal adds just enough contrast to make the hood feel like a designed piece rather than an afterthought. It’s subtle luxury without screaming about it.
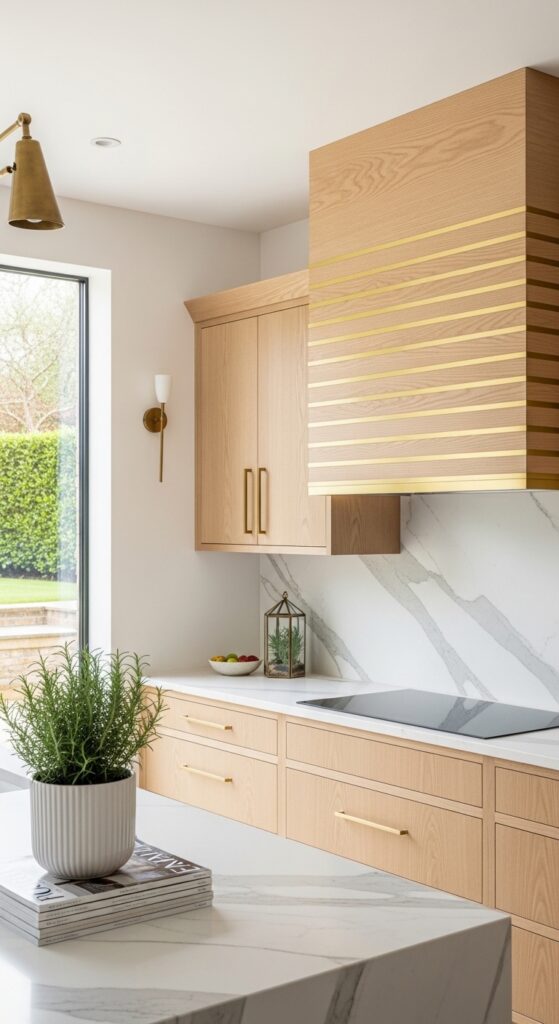
A heads-up on this one — brass tarnishes over time unless lacquered, and the color shift from bright gold to deeper patina changes the whole look. Decide upfront whether you want that aging process or plan to maintain the polished shine. Both paths look great, but they’re very different moods.
Maple and brass together whisper “expensive” without saying a word.
These will get you there:
- Natural Maple Plywood Hood Panel Sheets — Build a clean, light hood body with consistent maple that machines and finishes easily.
- Thin Brass Flat Bar Trim Stock — Add precision metal accents to your hood edges or create inlay channels for a custom look.
- Contact Adhesive for Metal-to-Wood Bonding — Secure your brass trim to maple cleanly without visible fasteners or nail holes.
13. Pecky Cypress Rustic Statement Hood
Pecky cypress has a look that no other wood can replicate — natural holes, worm channels, and pockets peppering the surface in a random, organic pattern. On a range hood, it’s immediately a conversation piece. The imperfections are the whole point, giving your kitchen a depth that stained or painted hoods can’t touch.
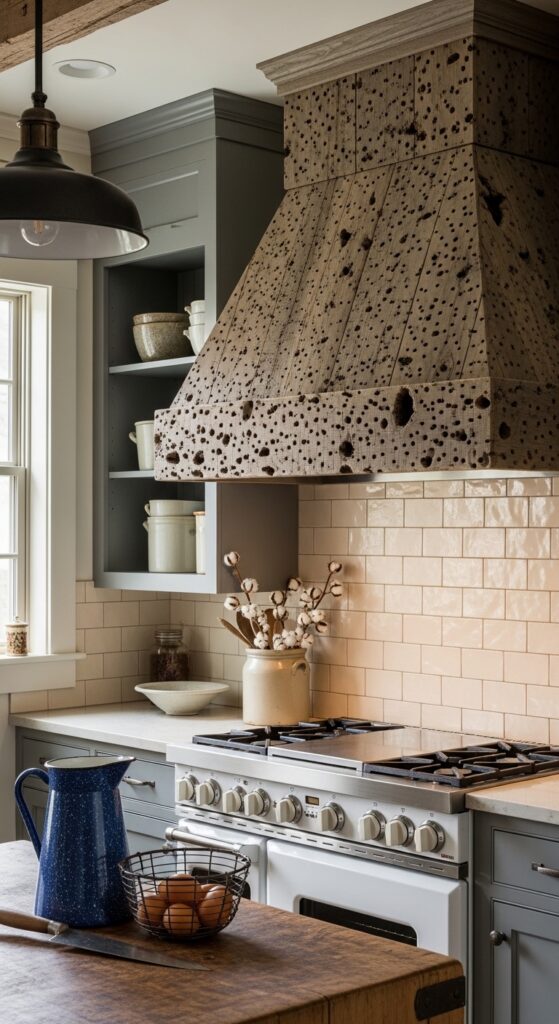
Worth mentioning — pecky cypress is a regional wood, primarily sourced from the southeastern United States. Shipping it elsewhere adds cost, and availability varies year to year. It’s also irregular by nature, so expect some pieces to have more “holes” than others. Embrace the inconsistency.
Perfect kitchens are forgettable. Pecky cypress makes sure yours isn’t.
Solid picks for this build:
- Genuine Pecky Cypress Board Selection Pack — Source your hood cladding from a curated set of boards with varied peck patterns.
- Wood Filler Epoxy for Rustic Surfaces — Fill any peck holes that are too deep while leaving the shallow ones exposed for texture.
- Antique Bronze Cup Handle Cabinet Pulls — Match the old-world feel of your cypress with hardware that looks like it’s been there forever.
14. Teak Slat Horizontal Ventilation Hood
Horizontal teak slats spaced slightly apart create a hood that doubles as ventilation — air passes through the gaps while the teak provides warmth and visual structure. It’s a design that borrows from mid-century and tropical influences, and teak’s natural oil content makes it one of the most moisture-resistant woods available.
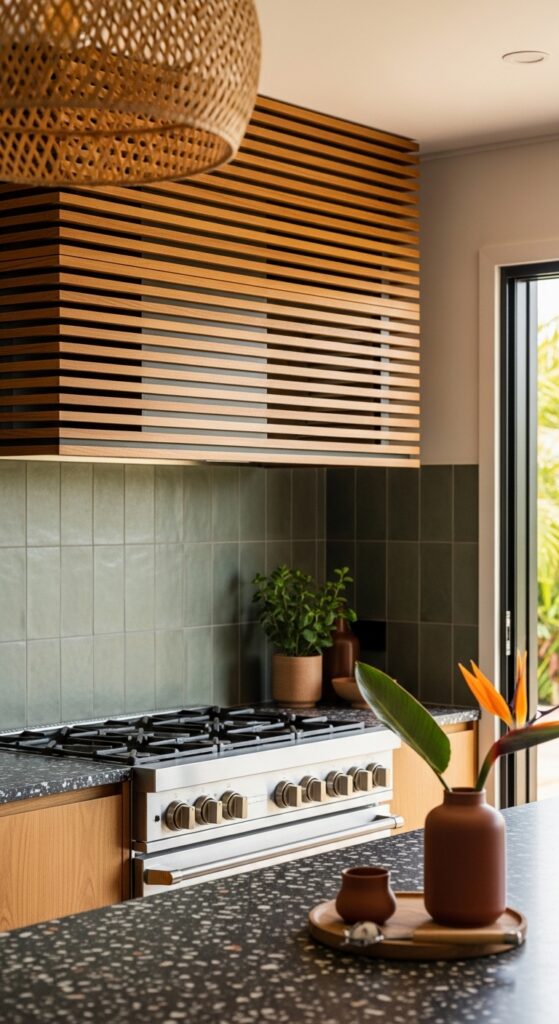
Here’s the catch — slat-style hoods need a proper internal exhaust system behind the visible wood. The slats themselves don’t filter grease; they’re purely decorative. You’ll need to pair them with a concealed liner that does the real ventilation work, plus the gaps between slats collect dust and need regular wiping.
Teak slats turn your hood into a piece of architecture, not just appliance cover.
These make the design work:
- Marine-Grade Teak Wood Slat Strips — Use moisture-resistant teak strips built to handle heat and steam without warping.
- Slim-Profile Concealed Hood Liner Unit — Hide your real ventilation system behind the slats with a compact, powerful liner.
- Microfiber Detail Cleaning Brush Set — Keep dust and grease out of your slat gaps with narrow brushes designed for tight spaces.
15. Driftwood-Wrapped Coastal Kitchen Hood
Actual driftwood pieces — or milled lumber finished to look like driftwood — arranged on a hood create a coastal aesthetic that feels genuinely gathered from the shore. The gray, bleached tones and irregular shapes work in beach houses and coastal-inspired kitchens where you want nature’s randomness on display.
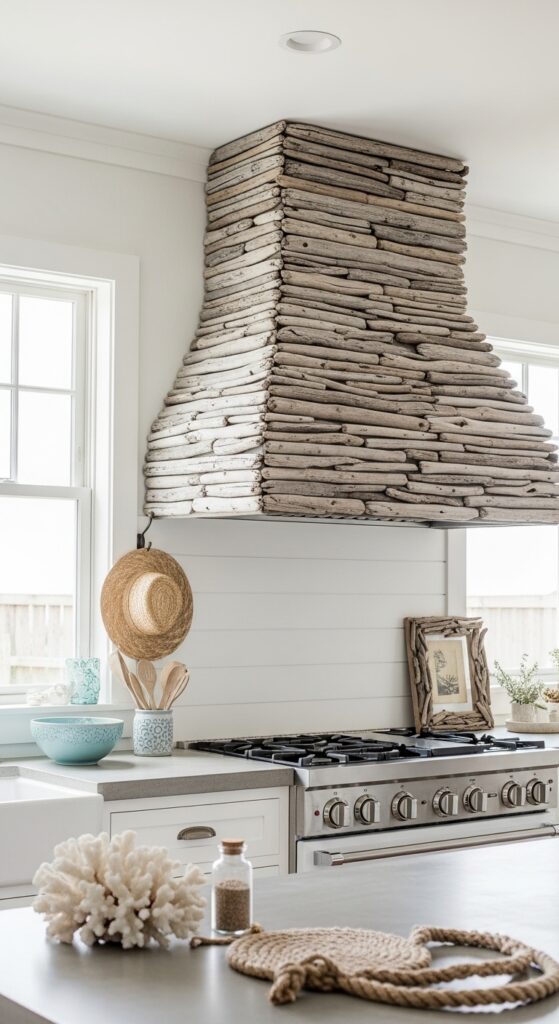
Heads up though — using real driftwood means every piece is different in thickness, length, and curvature. Getting them to lay flat on a hood surface requires a lot of trimming and shimming. Faux driftwood finishes on regular lumber give you the look with far less installation headache, and most guests won’t know the difference.
The ocean’s leftovers might be the most beautiful thing in your kitchen.
Pull it off with these:
- Natural Driftwood Plank Assortment Bundle — Get a variety of weathered, beach-toned pieces ready to arrange on your hood frame.
- Gray Weathering Wood Stain Accelerator — Turn fresh lumber into convincing driftwood gray in hours instead of decades.
- Nautical Rope Cabinet Knob Set — Tie the coastal theme together with hardware that echoes the beach without going overboard.
16. Ebonized Ash Sleek Contemporary Hood
Ebonizing — a chemical process that turns ash jet black while preserving every grain detail — creates a hood that looks like it belongs in a high-end architectural magazine. You get the darkness of black paint but with visible wood texture that reveals itself as you get closer. It’s moody, sophisticated, and surprisingly versatile.
One practical note — the ebonizing solution (typically iron acetate reacting with tannins) needs to be applied evenly or you’ll get blotchy results. This is a technique best left to a finisher who’s done it before. Also, ebonized surfaces can be more sensitive to water spots than conventionally finished wood, so sealing is essential.
Black with visible grain is the tuxedo of kitchen wood — formal but interesting.
Here’s what you need:
- Select-Grade Ash Hardwood Board Pack — Start with tight-grained ash that reacts evenly with ebonizing solution for consistent results.
- Iron Acetate Ebonizing Wood Treatment — Turn your ash hood panels jet black while letting every grain line show through.
- Hard Wax Oil Matte Topcoat Finish — Seal your ebonized ash with a food-safe, matte-sheen protector that won’t yellow.
17. Butcher Block-Style Thick Maple Hood
Taking the butcher block concept vertical — thick end-grain or edge-grain maple panels on a range hood — creates a look that ties your hood directly to your countertops. It’s cohesive, warm, and gives the hood a substantial, solid feel. The thickness of the wood reads as quality, and maple’s tight grain keeps the surface clean and contemporary.
Something to keep in mind — end-grain maple is heavy. Your hood frame and wall mounting need to be built to handle the weight. Edge-grain is lighter and easier to work with while still giving a similar visual effect. Either way, make sure your carpenter accounts for wood movement with seasonal humidity changes.
When your hood matches your countertop, the kitchen feels like it was built as one piece.
Bring it home with these:
- Edge-Grain Maple Butcher Block Panel — Clad your hood in the same thick, linear maple pattern that makes butcher block counters so appealing.
- Food-Safe Mineral Oil Wood Conditioner — Keep your maple hood nourished and protected with the same oil you’d use on your cutting board.
- Matte Black Iron Strap Hood Bracket Pair — Add subtle industrial support detail that contrasts the warm maple and holds everything solid.
InsideMake exists for one reason — to help you love your home more. We bring expert decor insights and room-specific inspiration directly to you.