
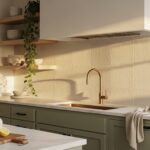
There’s something about a kitchen hutch that makes a space feel finished. It’s that one piece that holds your favorite dishes, anchors a bare wall, and quietly tells guests you’ve got taste. But buying one? That’s where things get tricky — good ones cost a fortune, and cheap ones look like it.
If you’ve been scrolling through photos of gorgeous hutches and wondering how to get the look without the price tag, you’re in the right place. DIY kitchen hutch ideas let you build exactly what your kitchen needs — the right size, the right style, the right storage. No settling for “close enough.”
Below, you’ll find 20 creative approaches to building, repurposing, and styling your own kitchen hutch. Whether you’re handy with power tools or prefer a simple weekend paint project, there’s something here that fits. Let’s get into it.
1. Reclaimed Barn Wood Hutch With Open Shelving
Old barn wood brings instant character that no stain can fake. The natural grain variations and weathered edges give your kitchen a lived-in warmth that pairs beautifully with both farmhouse and rustic-modern spaces. Sand lightly to remove splinters but keep the patina — that’s the whole point.
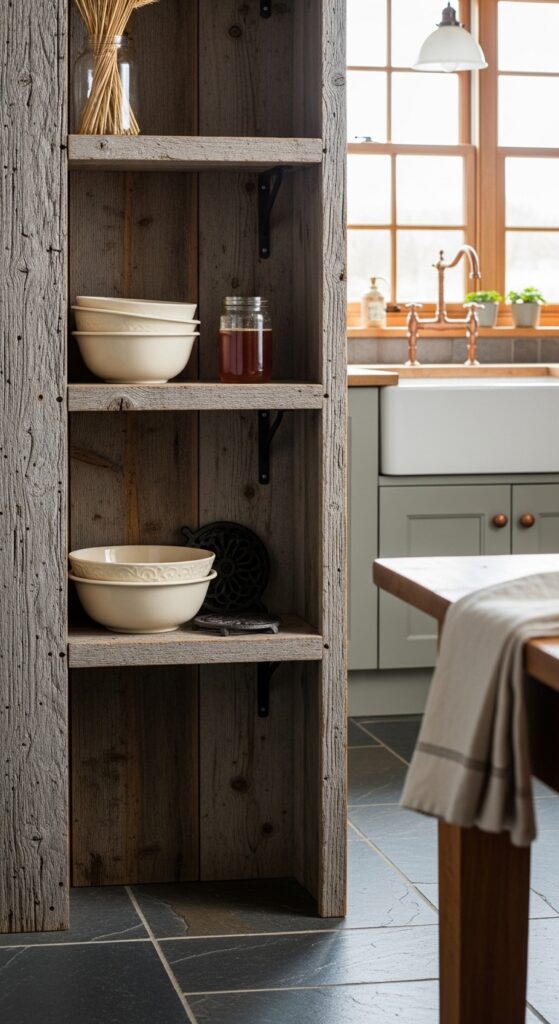
Be realistic though — sourcing quality barn wood takes time, and you’ll likely need to treat it for pests before bringing it indoors. Warped boards happen. Budget extra material because you’ll reject a few pieces during the build.
Rough edges make the best stories — and the best hutches.
Here are a few pieces to bring this look together:
- Rustic Floating Shelf Mounting Brackets — Anchor your reclaimed shelves securely to any wall with heavy-duty invisible hardware for a clean look.
- Natural Beeswax Wood Finish Paste — Protect your barn wood’s patina with a food-safe sealant for lasting beauty in the kitchen.
- Vintage Cast Iron Cup Hooks Set — Hang mugs and utensils beneath shelves with old-fashioned hooks for authentic farmhouse detail.
2. Painted Antique China Cabinet Makeover
That dusty china cabinet at the thrift store is hiding serious potential under its dated finish. A bold coat of chalk paint — think sage green, navy, or matte black — plus updated hardware turns a $50 find into a statement piece. Remove the doors for an open look or swap solid panels with chicken wire for texture.
Worth knowing — older cabinets may have lead paint underneath, so test before sanding. Also, chalk paint chips in high-traffic kitchens without a proper topcoat. Two coats of wax or poly aren’t optional.
The best kitchen hutches aren’t bought — they’re rescued.
Some products that’ll make this project smoother:
- Matte Chalk Finish Furniture Paint — Give any thrifted cabinet a smooth, modern finish with rich pigment for full coverage.
- Brushed Brass Cabinet Knob Collection — Update tired hardware instantly with warm-toned knobs for a polished refresh.
- Clear Matte Protective Topcoat Sealer — Lock in your paint job against daily kitchen wear with a non-yellowing protective layer.
3. Wall-Mounted Plate Rack Display Hutch
Skip the floor footprint entirely. A wall-mounted plate rack with a narrow shelf below creates the hutch silhouette without eating up kitchen square footage. This works brilliantly in galley kitchens and small eat-in spaces where every inch matters. Stagger plate sizes for visual rhythm.
One thing to watch — wall-mounted setups demand solid anchoring into studs, not just drywall anchors. Plates are heavier than they look, and a failed mount means broken ceramics and damaged walls. Measure twice, drill once.
Sometimes the smartest storage goes up, not out.
These picks make the wall-mount approach easier:
- Adjustable Wooden Wall Plate Rack — Display your favorite dishes vertically with a slim-profile rack for space-saving style.
- Heavy-Duty Concealed Shelf Brackets — Support serious weight on your hutch shelves with steel brackets hidden from view.
- Linen White Ceramic Dinner Plate Set — Stock your display rack with classic stoneware plates for a curated, cohesive arrangement.
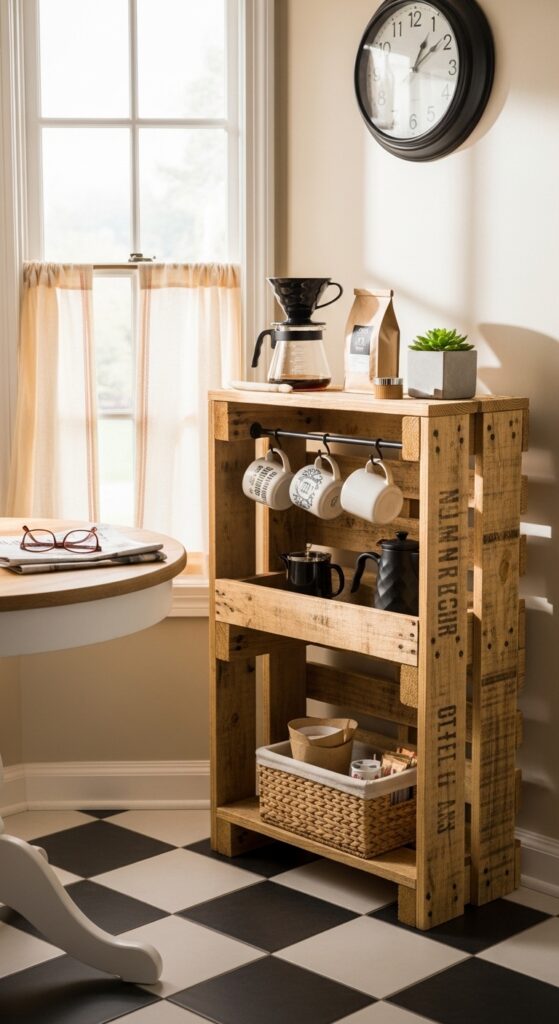
4. Freestanding Pallet Wood Coffee Station Hutch
Pallet wood is free, plentiful, and perfect for a dedicated coffee hutch. Build a compact three-shelf unit sized to hold your coffee maker, mugs, and a basket of supplies. The rough texture suits a casual kitchen vibe, and the narrow depth keeps it from feeling bulky against a wall.
Fair warning — not all pallets are safe for indoor use. Look for “HT” stamps (heat-treated) and avoid anything marked “MB” (methyl bromide). Also, pallet wood splits easily when you drive screws near edges. Pre-drill everything.
Your morning coffee deserves its own corner — build one.
Gear up for this coffee station project:
- Compact Under-Shelf Mug Holder Rack — Slide hooks beneath your hutch shelf to hang mugs within easy reach for busy mornings.
- Chalkboard Label Jar Storage Canisters — Organize coffee, sugar, and tea in labeled glass jars for tidy countertop-free storage.
- Weatherproof Pallet Wood Sealant Spray — Seal your pallet build against moisture and staining with a quick-dry protective coat.
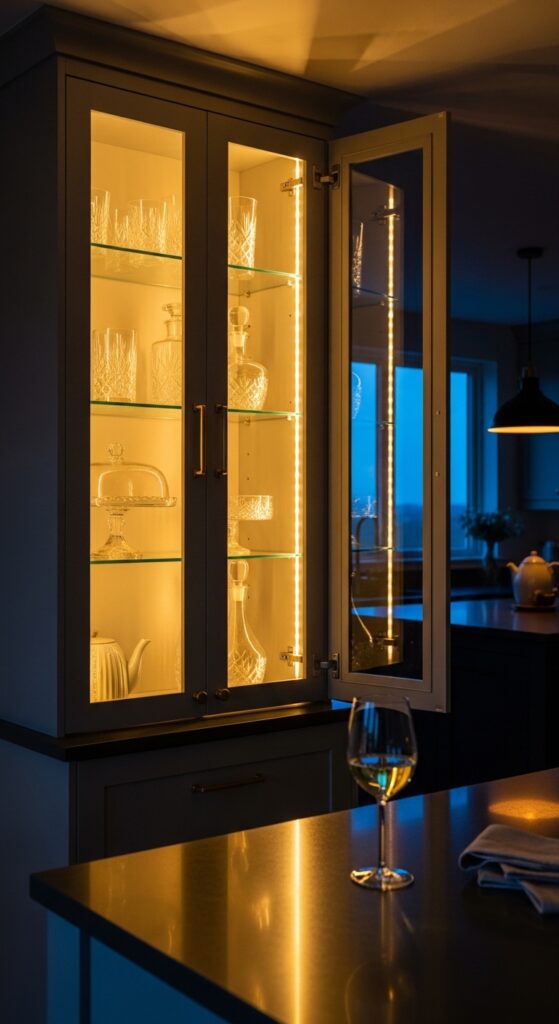
5. Glass-Front Cabinet Hutch With LED Lighting
Adding glass fronts to a simple wooden frame turns basic shelving into something that looks built-in and expensive. The trick is LED strip lighting along the inside top edge — it makes glassware glow and gives the whole piece a designer feel. Use tempered glass for safety, especially in kitchens with kids.
Keep in mind — glass-front cabinets mean everything inside is visible, all the time. Mismatched dishes, coffee-stained mugs, and random Tupperware lids won’t look charming behind glass. Curate what goes in, or the effect backfires.
Light changes everything — especially what’s behind glass.
These products bring the glow:
- Warm White LED Strip Light Kit — Line the interior of your hutch with soft, dimmable light for an inviting display glow.
- Tempered Glass Cabinet Door Panels — Replace solid panels with safe, polished glass inserts for a high-end open look.
- Adhesive Cable Management Channel Strips — Hide LED wiring neatly along hutch edges with slim stick-on channels for a clean finish.
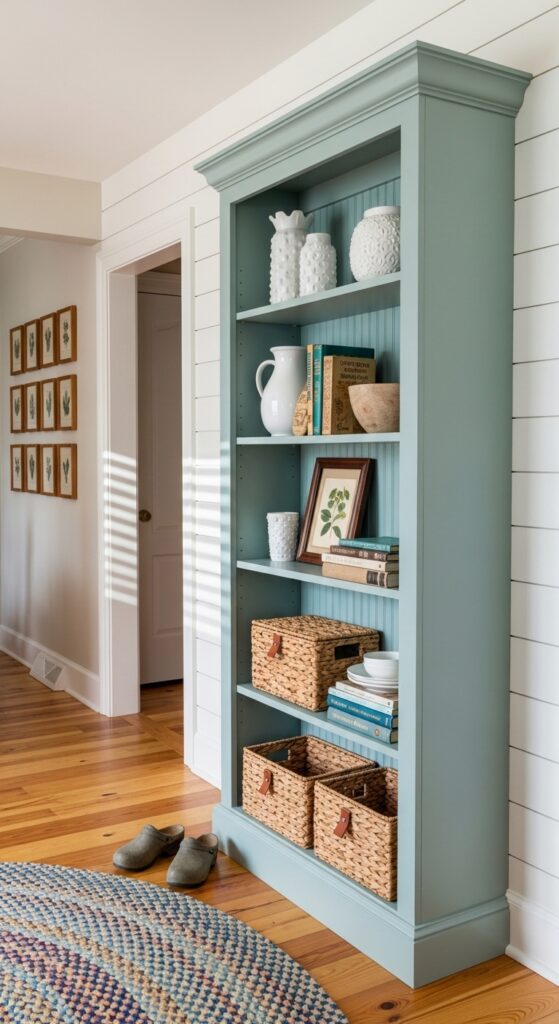
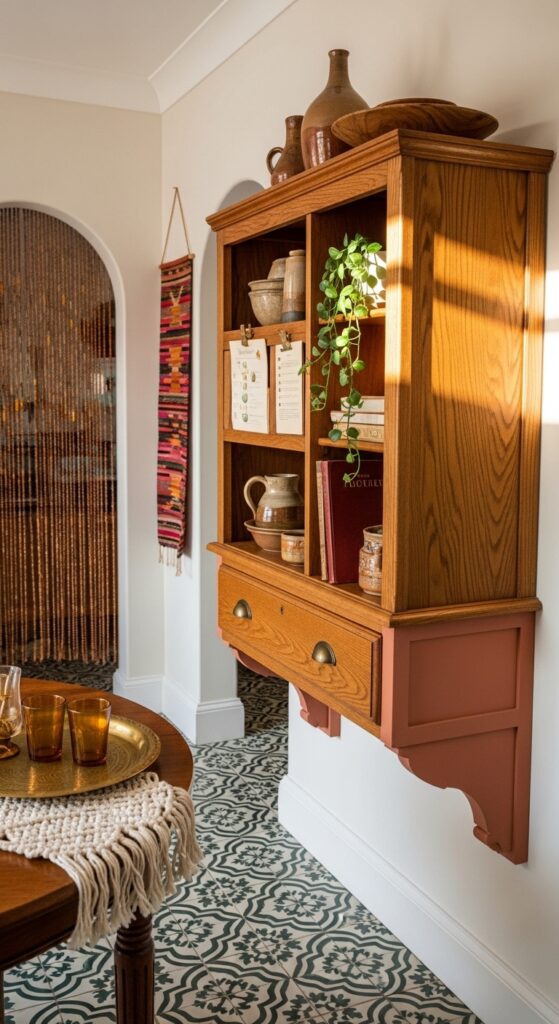
6. Repurposed Bookshelf to Kitchen Hutch Conversion
That old bookshelf collecting dust can become a kitchen hutch in a weekend. Add a beadboard backing, a fresh coat of paint, and some crown molding along the top. Suddenly it reads as intentional built-in storage rather than a repurposed hand-me-down. Use the lower shelves for baskets and the upper ones for display.
Here’s the reality — bookshelves aren’t built for kitchen weight. Adjustable shelves on plastic pegs will sag under heavy stoneware. Reinforce with L-brackets underneath, or replace the pegs with metal shelf pins rated for the weight.
A bookshelf becomes a hutch the moment you believe in it — and add crown molding.
Grab these to make the conversion convincing:
- Decorative Beadboard Adhesive Wall Panels — Line the back of any shelf unit with textured panels for instant built-in character.
- Paintable Crown Molding Trim Pieces — Cap the top of your bookshelf-hutch with finished trim for a custom-furniture look.
- Woven Seagrass Rectangular Storage Baskets — Fill lower shelves with natural-fiber baskets for hidden storage that still looks styled.
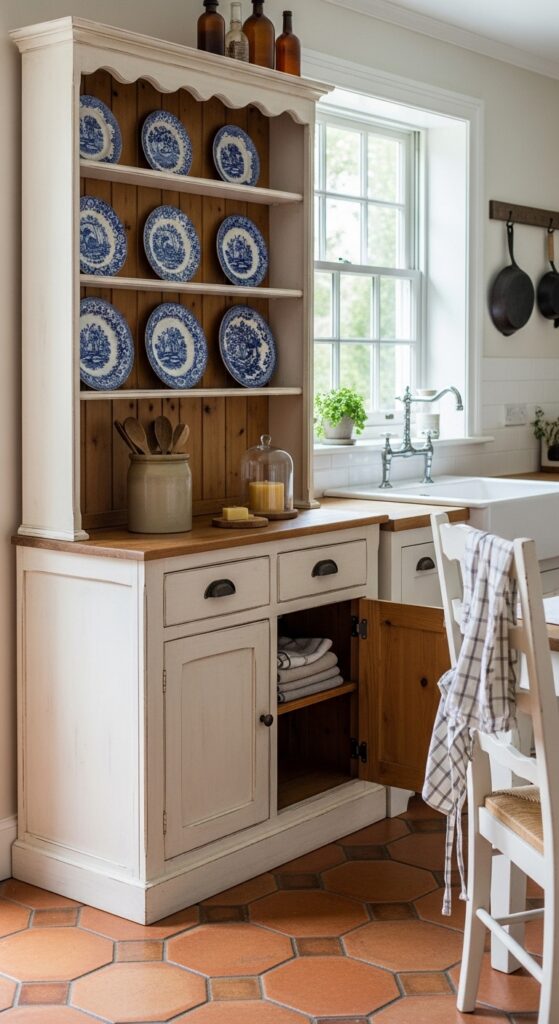
7. Farmhouse Step-Back Hutch From Scratch
The classic step-back design — a deeper base with a shallower top section — is the gold standard of kitchen hutches. Building one from scratch with pine boards and basic joinery gives you complete control over dimensions. Paint it white, distress the edges lightly, and add bin-pull hardware for pure farmhouse authenticity.
Truth is — this is an intermediate-level woodworking project that needs a table saw, pocket-hole jig, and patience. If you’ve only done beginner projects, team up with a more experienced builder. Rushing the joinery shows in the final piece.
A step-back hutch is the kitchen equivalent of a front porch — it just feels like home.
These essentials support the build:
- Pocket Hole Joinery Starter Kit — Create strong, hidden joints throughout your hutch frame with a beginner-friendly drilling system.
- Antique Pewter Bin Pull Hardware Set — Finish your farmhouse base cabinets with period-correct drawer pulls for authentic detail.
- Pre-Primed Pine Board Lumber Pack — Start your build with smooth, ready-to-paint boards for clean lines and less prep work.
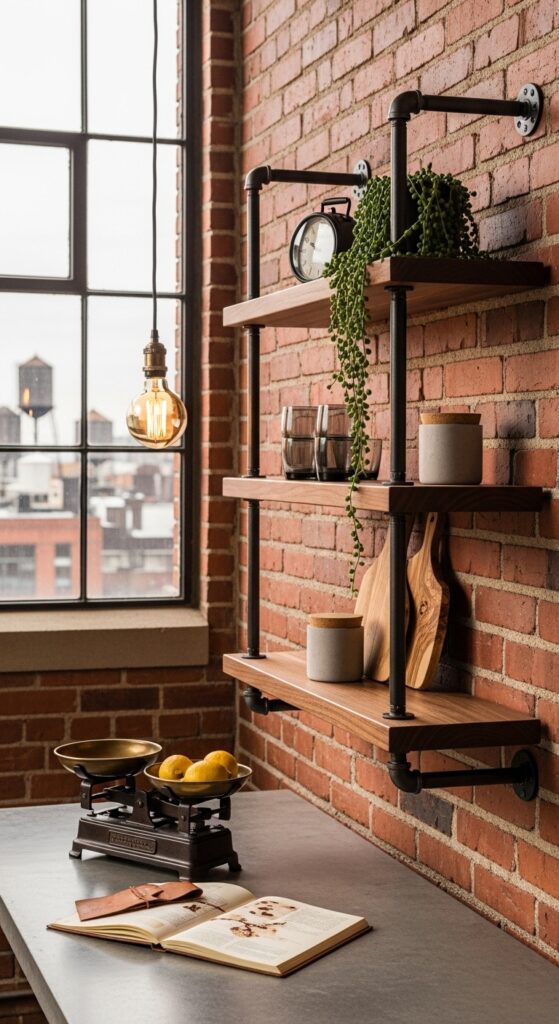
8. Industrial Pipe and Wood Open Hutch Shelving
Black iron pipe fittings paired with thick wood shelves create an industrial hutch that works in loft-style and modern kitchens. The pipe framework acts as both structure and style — no traditional cabinet box needed. Flange mounts bolt directly to the wall, so the whole thing feels sturdy and intentional.
Something to consider — iron pipe is heavy, and the fittings add up fast in cost. A five-shelf unit can easily run $150 or more in pipe alone. Also, unsealed iron will leave rust marks on anything it touches when moisture is present. Clear-coat the pipes.
Industrial doesn’t mean cold — it means confident.
Build out the industrial look with these:
- Black Iron Pipe Shelf Bracket Kit — Construct sturdy, visible shelf supports with pre-cut pipe pieces for quick assembly.
- Live Edge Walnut Floating Shelf Slab — Pair raw wood grain with iron pipe for a striking contrast that feels gallery-worthy.
- Matte Black Spray Sealant for Metal — Protect your pipe framework from kitchen humidity and rust with a quick-drying protective finish.
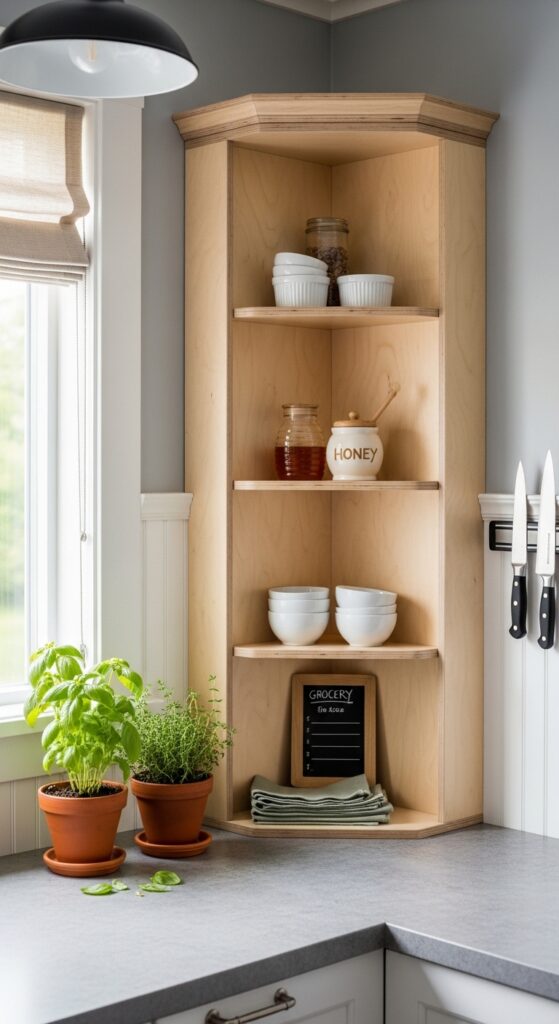
9. Corner Kitchen Hutch With Diagonal Shelving
Dead corner space becomes prime real estate with a triangular hutch built to fit. Diagonal shelves maximize an awkward nook that standard furniture ignores. This is especially effective in L-shaped kitchens where two counters meet and leave a wasted gap.
Honestly, cutting consistent 45-degree angles for diagonal shelves is harder than it sounds. Even small measurement errors compound across multiple shelves, leaving visible gaps at the wall. Use a digital angle finder and cut test pieces first.
Corners aren’t wasted space — they’re untapped potential.
Fill that corner with these helpers:
- Digital Angle Measurement Finding Tool — Nail precise corner measurements for custom-fit shelves with an easy-to-read digital gauge.
- Triangular Lazy Susan Rotating Shelf Insert — Add spinning storage to your corner hutch bottom shelf for easy access to tucked-away items.
- Adjustable Corner Wall Shelf Mounting System — Secure diagonal shelves into corner studs with specialized hardware designed for angled installations.
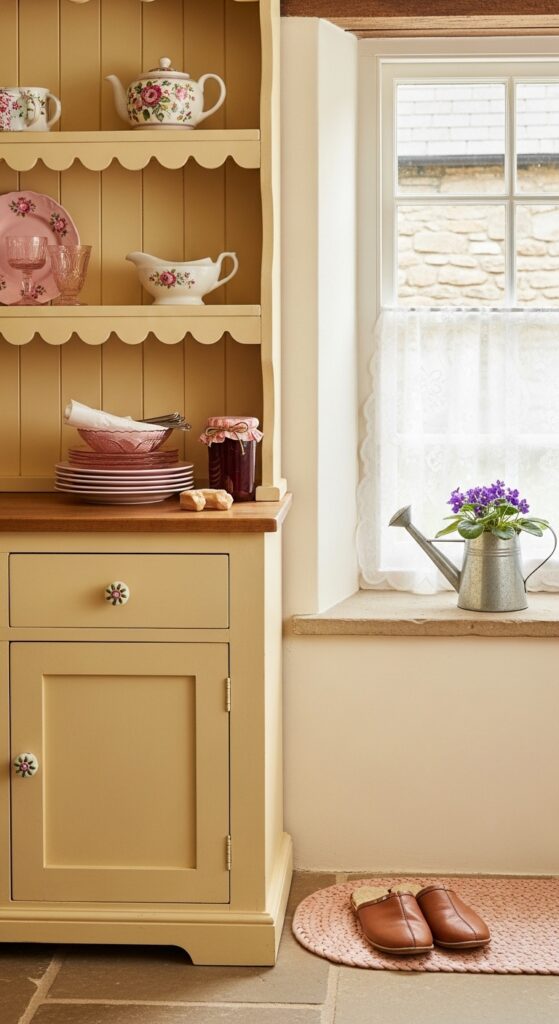
10. Cottage-Style Hutch With Scalloped Trim Details
Scalloped edges along the shelf fronts and a curved apron at the top give a simple hutch that cozy cottage personality. Cut the scallops with a jigsaw using a cardboard template for consistency. Soft colors like butter yellow, robin’s egg blue, or warm cream sell the cottage aesthetic completely.
Just so you know — scalloped trim catches grease and dust in a kitchen faster than flat edges. Plan to wipe those curves down weekly, or the charm fades into grime. A semi-gloss paint finish makes cleanup much easier than matte.
Scalloped edges whisper “handmade” in the best possible way.
Add cottage charm with these finds:
- Decorative Scalloped Wood Trim Molding — Line shelf fronts with pre-cut wavy trim for instant cottage character without freehand cutting.
- Soft Pastel Chalk Style Paint Bundle — Choose from curated vintage colors for a gentle, sun-washed finish on your hutch.
- Ceramic Floral Knob Drawer Pull Set — Top off cottage style with hand-painted flower pulls for sweet, whimsical detail.
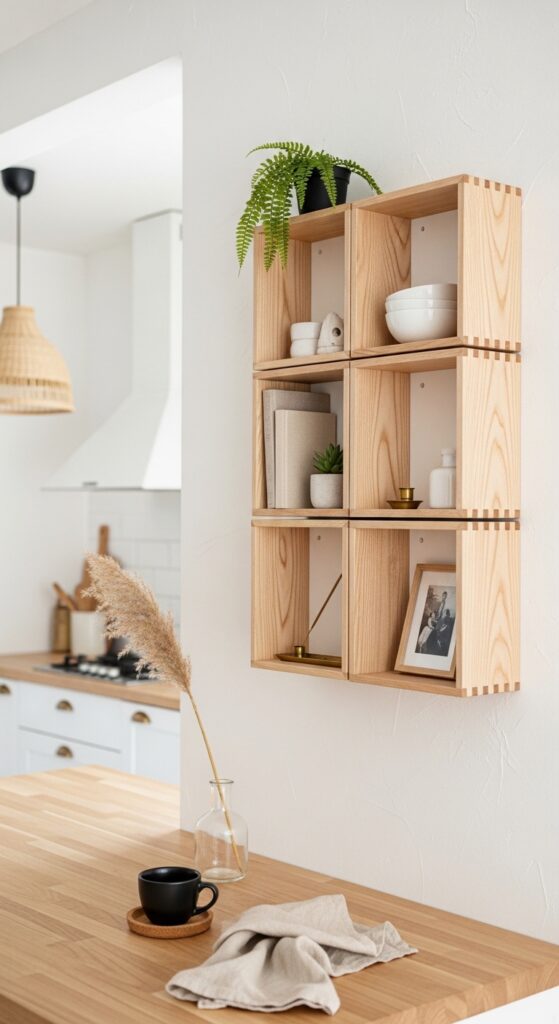
11. Minimalist Floating Box Shelf Hutch Arrangement
Forget the traditional hutch silhouette. Mount a cluster of open wooden box shelves in a grid or staggered pattern on your kitchen wall. Each box holds one or two items — a plant, a stack of bowls, a vintage canister. The result feels curated and modern without any bulky furniture footprint.
A heads-up — floating box shelves have limited depth, usually 4 to 6 inches usable space. Standard dinner plates won’t fit. This approach works best for display items, small bowls, spice jars, and decorative objects rather than everyday dinnerware.
A grid of small boxes can hold more style than one big cabinet.
Put together the minimalist grid with these:
- Square Floating Cube Wall Shelf Set — Mount a grouping of clean-lined boxes for a modern, modular hutch alternative.
- Slim Profile Invisible Shelf Mounting Hardware — Keep your box shelves looking like they float with concealed heavy-duty wall anchors.
- Small White Ceramic Bud Vase Collection — Accent your box shelves with single-stem vases for effortless, rotating seasonal decor.
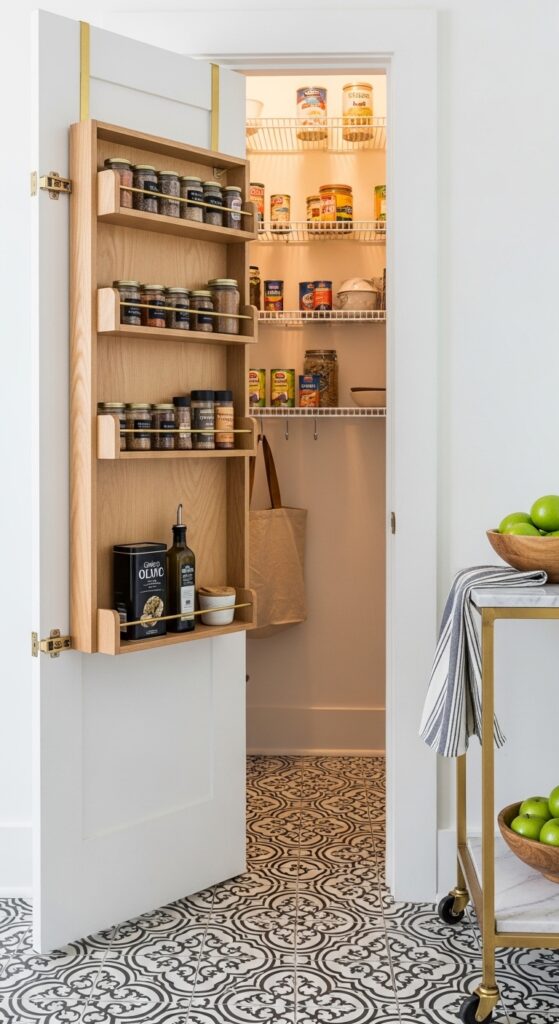
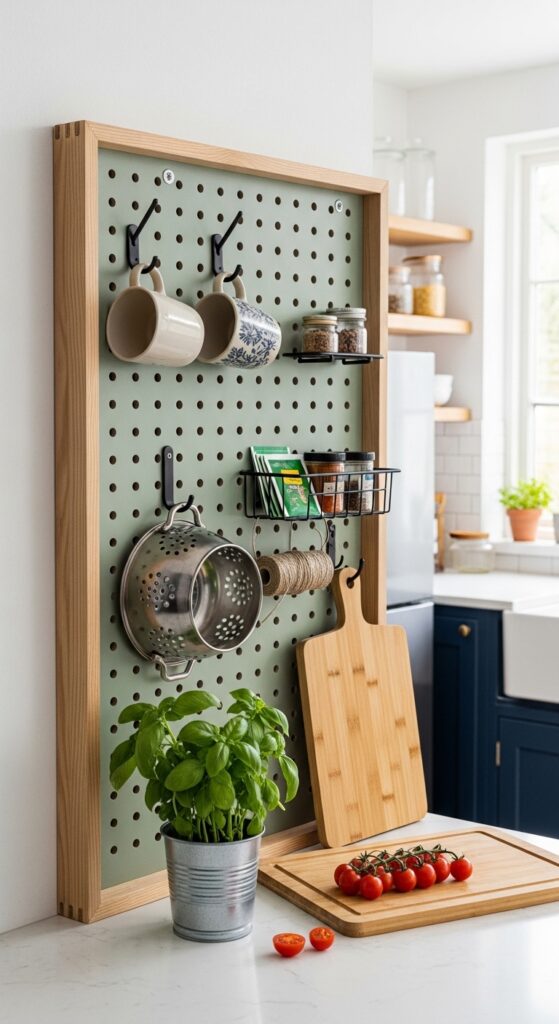
12. Pantry Door-Mounted Fold-Down Hutch Shelf
If counter and wall space are both spoken for, mount a fold-down shelf system on the inside of your pantry door. When open, it creates a mini hutch display for spices, oils, and frequently grabbed items. When closed, it disappears completely. Clever for studio apartments and tiny kitchens.
Real talk — door-mounted systems put stress on hinges over time. Reinforce the door hinges with longer screws into the frame before loading up the shelves. Keep total shelf weight under 15 pounds to avoid sagging or door damage.
The best storage hides in plain sight — or behind a closed door.
Make this space-saver work with:
- Over-Door Adjustable Storage Shelf Rack — Mount slim shelves on any standard pantry door for instant hidden kitchen storage.
- Self-Closing Heavy Duty Door Hinge Set — Upgrade weak pantry hinges to support the added weight of mounted shelving.
- Narrow Stackable Clear Spice Jar Containers — Fill door shelves with uniform, labeled containers for tidy and visible spice storage.
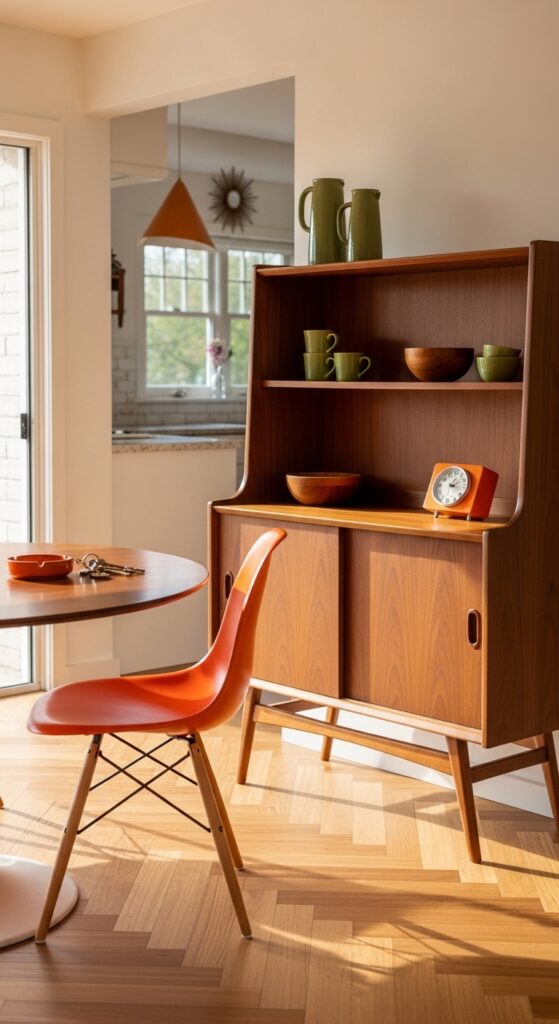
13. Mid-Century Modern Hutch With Tapered Leg Base
Tapered legs, clean lines, and a mix of open and closed storage give this DIY hutch a 1960s vibe that fits beautifully in contemporary kitchens. Use walnut-stained plywood for the body and add hairpin or angled wooden legs to the base cabinet. The open top section keeps it from feeling heavy.
Not going to sugarcoat it — achieving the mid-century look depends heavily on getting proportions right. Legs too short and it looks squatty. Too tall and it’s awkward. Study reference photos and mock up dimensions with cardboard before cutting your plywood.
Mid-century lines prove that less hardware means more style.
Channel the era with these pieces:
- Angled Solid Wood Tapered Furniture Legs — Attach retro-profile legs to your hutch base for authentic mid-century silhouette and lift.
- Walnut Wood Veneer Adhesive Sheet Roll — Wrap exposed plywood edges in real walnut veneer for a professional, furniture-grade finish.
- Brass Hairpin Leg Floor Protector Caps — Protect kitchen floors while adding a metallic accent to your tapered leg base.
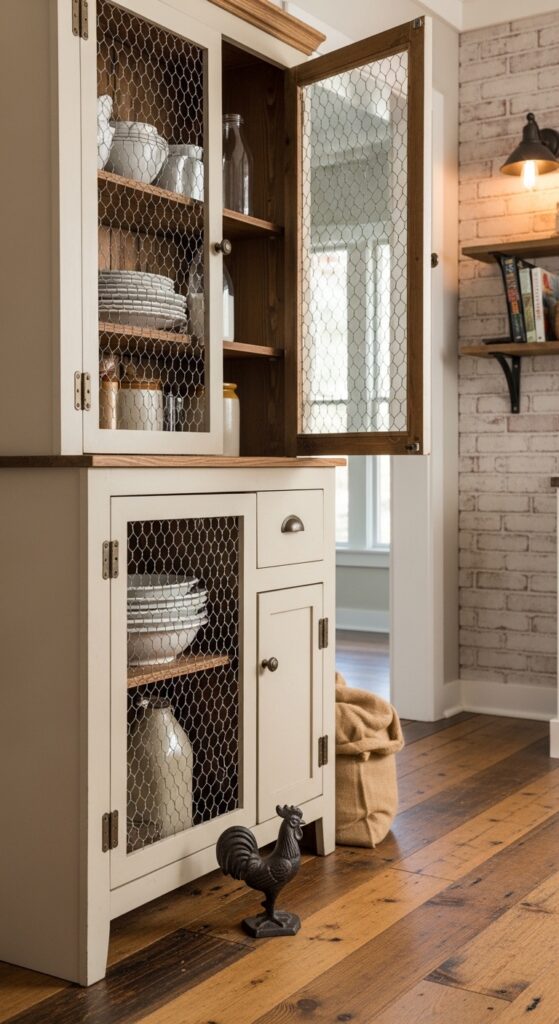
14. Chicken Wire Cabinet Door Kitchen Hutch
Replacing solid cabinet doors with chicken wire panels adds rustic texture and lets you peek inside without opening anything. Build a basic frame, staple the wire to the back, and hinge it onto your hutch. The look splits the difference between fully open and fully closed — breezy but contained.
Word of caution — chicken wire edges are sharp and will scratch hands during installation. Wear heavy gloves and use a staple gun with short staples to secure it tightly. Loose wire bulges outward over time, and that reads as sloppy rather than charming.
Chicken wire turns a cabinet door into a conversation piece.
Wire up your hutch with these supplies:
- Galvanized Chicken Wire Mesh Roll — Cut custom panel sizes from a quality wire roll for a snug, clean fit in your cabinet frames.
- Small Antique Bronze Cabinet Hinge Pair — Mount your wire-front doors with vintage-look hinges for seamless farmhouse function.
- Heavy Duty Upholstery Staple Gun Tool — Stretch and lock chicken wire firmly into wooden frames with a reliable, easy-squeeze stapler.
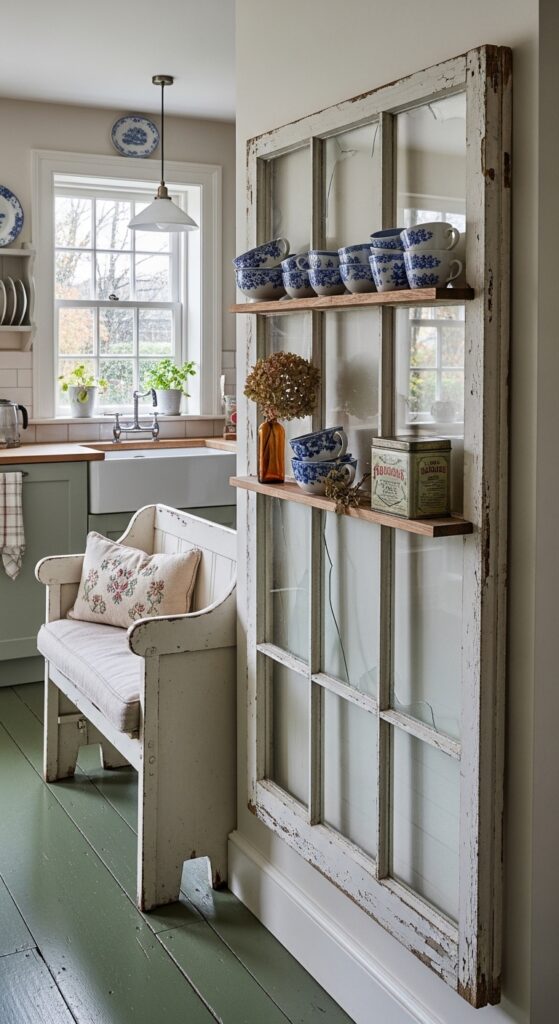
15. Windowpane Salvage Frame Hutch Back
Grab an old window frame from a salvage yard and mount it as the decorative back panel of your hutch. The mullions create natural “sections” for display, and the aged wood or peeling paint adds character no new material can replicate. Attach shelves directly to the window frame or mount it behind freestanding shelves.

Here’s what nobody mentions — old windows are rarely square. Warped frames mean your shelves won’t sit level without shimming. Measure diagonal corners to check for square before you design around it, and plan for adjustment.
An old window becomes a new focal point when you give it shelves.
Salvage your hutch back with these:
- Clear Non-Yellowing Glass Replacement Panes — Replace cracked or missing glass in your salvage frame with crystal-clear safety panes.
- Antique Window Frame Wall Mounting Kit — Secure heavy vintage frames to your wall with specialized anchors rated for salvage weight.
- Distressed Wood Touch-Up Marker Set — Blend shelf attachment points into your salvage frame with color-matched repair pens.
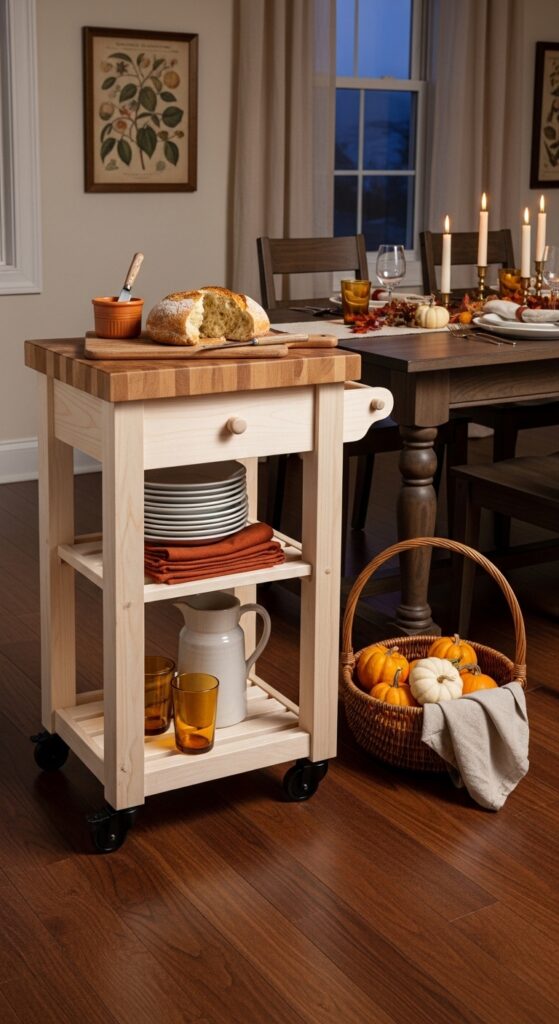
16. Rolling Kitchen Cart Hutch With Locking Casters
Build a hutch on wheels for kitchens where flexibility matters more than permanence. A compact rolling cart with two or three shelves and a top display area moves wherever you need it — against a wall for daily use, into a corner for parties, beside the table for holiday buffets. Lock the casters to keep it planted.
Straight talk — rolling hutches topple if they’re too tall and narrow. Keep the height-to-base ratio under 2:1, and load the heaviest items on the bottom shelf. Top-heavy carts on wheels are an accident waiting for a nudge.
A hutch that moves with your life is a hutch that actually gets used.
Roll into this build with:
- Heavy Duty Swivel Locking Caster Wheels — Give your hutch smooth mobility and solid stability with industrial-grade locking wheels.
- Butcher Block Solid Wood Cart Top Surface — Crown your rolling hutch with a thick, food-safe wooden surface for beauty and function.
- Slim Side-Mount Towel Bar Rail Holder — Attach a sleek bar to the hutch side for hanging towels or utensils within arm’s reach.
17. Two-Tone Painted Hutch With Contrasting Interior
Paint the exterior one color and the interior shelves a contrasting shade for a hutch that pops every time you open it or glance inside. Classic combos include black exterior with mustard interior, white exterior with deep teal inside, or gray exterior with blush pink shelves. The contrast creates depth and makes displayed items stand out.
Small caveat — two-tone painting requires excellent taping between color zones. Bleed-through at the transition line ruins the effect. Use a high-adhesion painter’s tape and seal the edge with the first color before applying the second. It’s an extra step that saves the whole project.
The inside of your hutch deserves as much thought as the outside.
Nail the two-tone effect with:
- High Adhesion Sharp Line Painter Tape — Create crisp, bleed-free color transitions between your hutch exterior and interior tones.
- Bold Accent Interior Cabinet Paint Quart — Make the inside of your hutch pop with a rich, saturated contrast color.
- Angled Detail Paint Brush Starter Set — Reach tight hutch corners and edges with precision-cut brushes for flawless two-tone work.
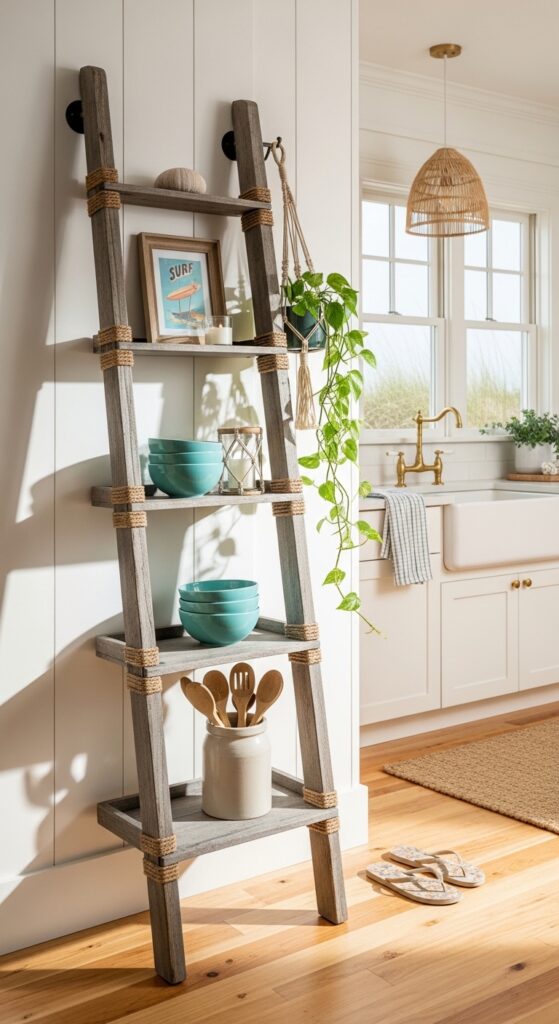
18. Ladder Shelf Hutch With Tiered Display
Lean a decorative ladder shelf against the wall and style it as a vertical kitchen hutch. Each rung tier holds a different category — top for plants, middle for dishes, bottom for heavy crocks. The A-frame shape adds visual interest that a flat hutch can’t match, and the lean-to design means zero wall mounting.
Be aware — ladder shelves taper narrower toward the top, so shelf space decreases with each tier. Plan your heaviest and largest items for the bottom and only lightweight decorative pieces up high. Also, anti-tip wall straps are smart insurance even for lean-to designs.
A ladder shelf makes vertical space your best friend in a small kitchen.
Style the ladder hutch with these:
- Rustic Wood A-Frame Leaning Shelf Unit — Set up a five-tier display in minutes with a sturdy lean-to frame that needs no tools.
- Anti-Tip Furniture Wall Safety Strap Kit — Secure your leaning shelf quietly to the wall for peace of mind around kids and pets.
- Matte Stoneware Kitchen Crock Utensil Holder — Anchor the bottom tier with a hefty, handsome crock for wooden spoons and whisks.
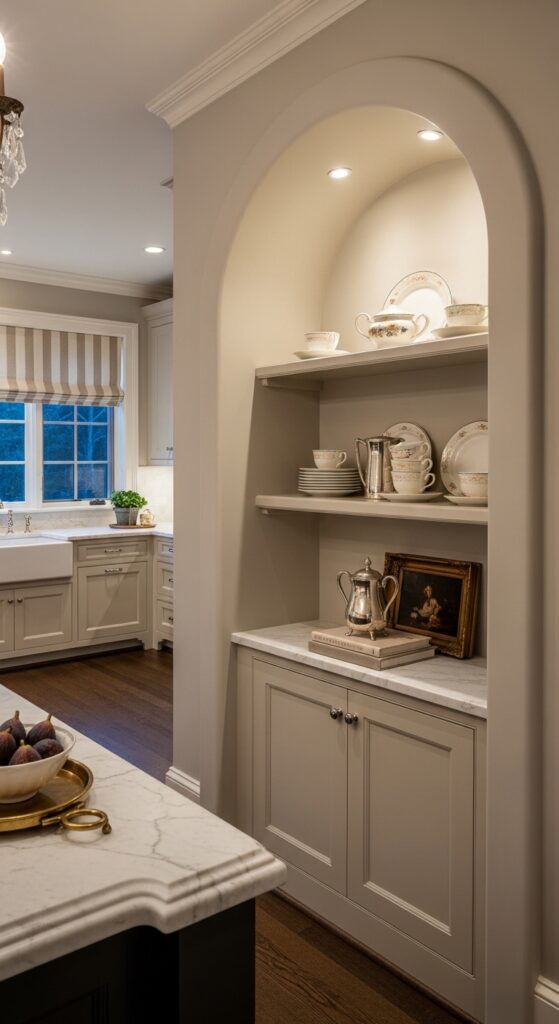
19. Built-In Alcove Kitchen Hutch With Arched Top
If your kitchen has a recessed wall niche or you’re willing to frame one out, an arched-top built-in hutch looks like it’s been there since the house was built. The arch softens the straight lines of a kitchen and adds architectural interest. Paint it the same color as the surrounding wall for a seamless look.
Reality check — framing an arched top requires bending plywood or cutting a curved header, both of which are advanced carpentry tasks. If arches intimidate you, a flat header with decorative corbels underneath gives a similar built-in feel with much simpler cuts.
An arched hutch makes your kitchen feel like it has history — even if you built it last Saturday.
Bring the built-in look home with:
- Flexible Bendable Plywood Arching Sheet — Form smooth curves for your hutch arch with specialty plywood designed to bend without cracking.
- Decorative Wood Corbel Shelf Support Pair — Add architectural weight beneath your hutch header with carved support brackets.
- Recessed Alcove LED Spotlight Puck Lights — Illuminate your built-in hutch from above with small, wireless spotlights for a custom look.
InsideMake exists for one reason — to help you love your home more. We bring expert decor insights and room-specific inspiration directly to you.