

There’s a specific kind of frustration that hits when you’re crouching over a cooler at 7 AM, trying to slice an avocado on a wobbly paper plate while mosquitoes circle your coffee. Cooking at camp shouldn’t feel like a survival challenge — it should be one of the best parts of the trip.
If you’ve been dreaming about a real cooking setup that packs down small and works hard, you’re in the right spot. The right DIY camp kitchen ideas can turn a chaotic campsite into an organized outdoor cooking space — without spending hundreds at a gear shop.
Below, you’ll find 19 creative, buildable kitchen setups covering everything from compact prep stations to clever storage hacks. Each one is designed for real campsite conditions and real budgets. Let’s get into the builds.
1. Fold-Down Plywood Chuck Box: The Classic All-in-One Setup
A plywood chuck box keeps every cooking tool, spice jar, and utensil in one latched case that opens into a full workstation. The hinged lid doubles as a prep surface, and interior shelves keep everything from sliding around during transport. Use 1/2-inch Baltic birch plywood for the perfect balance of strength and weight.
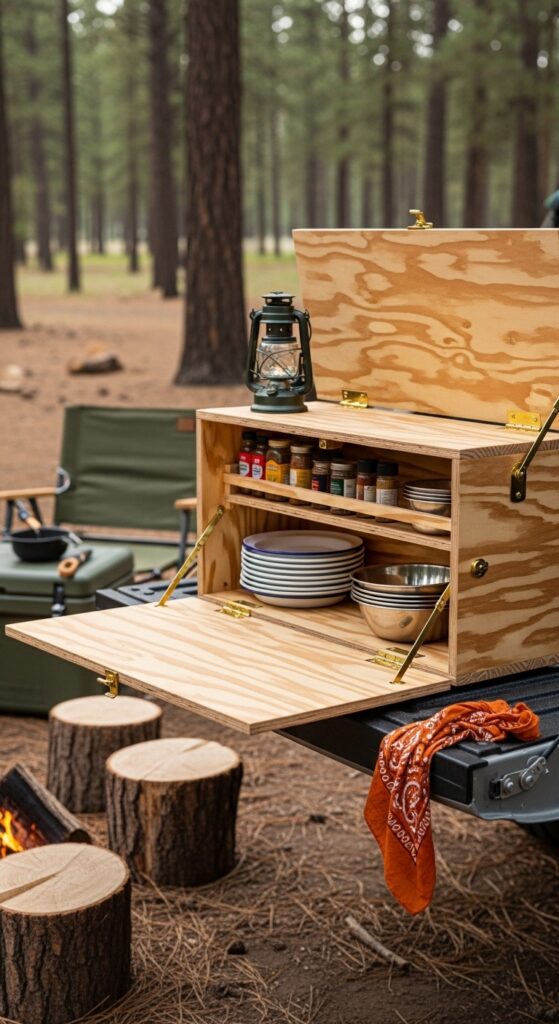
Be realistic though — a fully loaded chuck box gets heavy fast. You’ll want two people to lift it once it’s packed, and it takes up serious truck bed space. It’s best for car camping where weight isn’t a dealbreaker.
The chuck box isn’t just storage — it’s your entire kitchen folded into one carry.
Here are a few things that’ll make this build even better:
- Durable Fold-Down Plywood Camp Box — Organize your entire cook setup with a hinged lid that doubles as a cutting surface for quick meals.
- Heavy-Duty Brass Latch Hardware Set — Secure your chuck box shut during bumpy drives with latches built to handle off-road vibration.
- Waterproof Wood Sealant Finish Coat — Protect your plywood build from rain and morning dew with a single clear coat that lasts all season.
2. PVC Pipe Utensil Rack: Hang Everything Within Arm’s Reach
Cut PVC pipes into short sections, drill holes at the top, and thread paracord through to create a hanging utensil organizer that ties between two trees. Each pipe sleeve holds a spatula, tongs, or serving spoon upright and off the ground. The whole thing rolls up flat for packing.

One thing to watch — PVC can crack in very cold weather, so if you camp in late fall or winter, swap for slightly thicker-walled pipe. Also, S-hooks work better than paracord loops if you want faster access while cooking.
Keep your tools hanging and your prep space clear — that’s the real camp kitchen hack.
A few picks to pull this off cleanly:
- Adjustable Outdoor Hanging Utensil Organizer — Free up table space by keeping spatulas and tongs visible and reachable above your stove area.
- Stainless Steel S-Hook Variety Pack — Clip cooking tools onto any line, branch, or crossbar with hooks that won’t rust after a rainy weekend.
- Braided Paracord Utility Rope Spool — String a tool line between trees in seconds with cord that holds weight and packs down to nothing.
3. Repurposed Dresser Drawer Spice Station: Organized Flavor on the Go
Grab an old dresser drawer from a thrift store, sand it down, and add small dividers to create a portable spice station that slides right into your camp kitchen setup. Label each slot, line the bottom with grip shelf liner, and your spice jars stay upright through every dirt road and sharp turn.
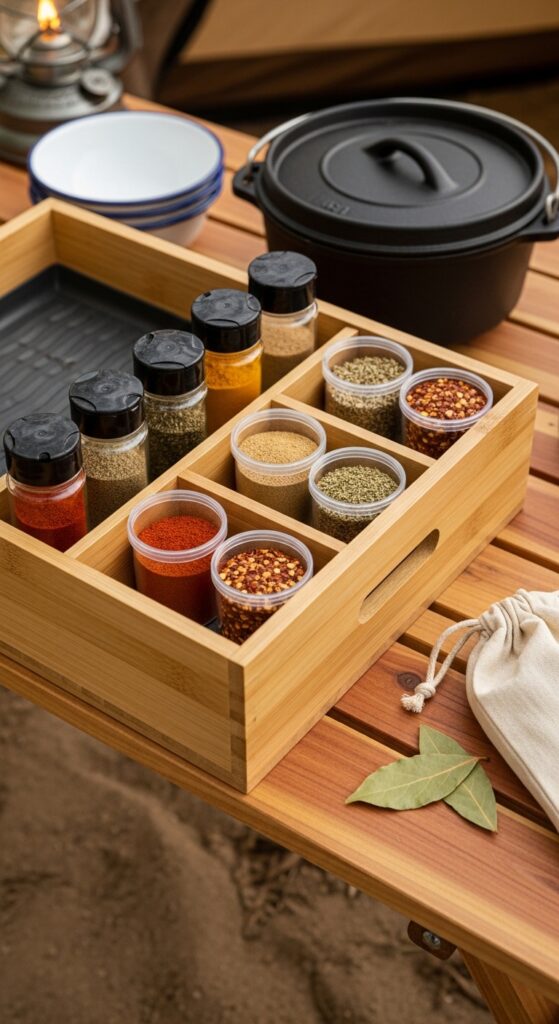
Worth knowing — glass jars look great but rattle and risk breaking on rough roads. Transfer spices into small plastic containers with screw-top lids instead. You’ll save weight and avoid the heartbreak of cleaning cumin out of your entire gear bin.
A dedicated spice drawer turns campfire food into something people actually talk about later.
These will round out the build:
- Compact Stackable Spice Container Set — Fill each twist-top jar with your go-to seasonings for instant flavor without digging through bags.
- Non-Slip Rubber Shelf Liner Roll — Line your drawer bottom so nothing shifts or tips during the drive to camp.
- Small Bamboo Drawer Divider Kit — Create custom-width slots inside your repurposed drawer to fit jars of any size snugly.
4. Collapsible Sawhorse Prep Table: Sturdy Surface, Zero Bulk
Two folding sawhorses plus a sanded plywood top give you a rock-solid prep table that breaks down completely flat. It stands at perfect cutting height, holds a heavy Dutch oven without wobbling, and costs under twenty bucks in lumber. Stain the top with food-safe mineral oil for easy cleanup.
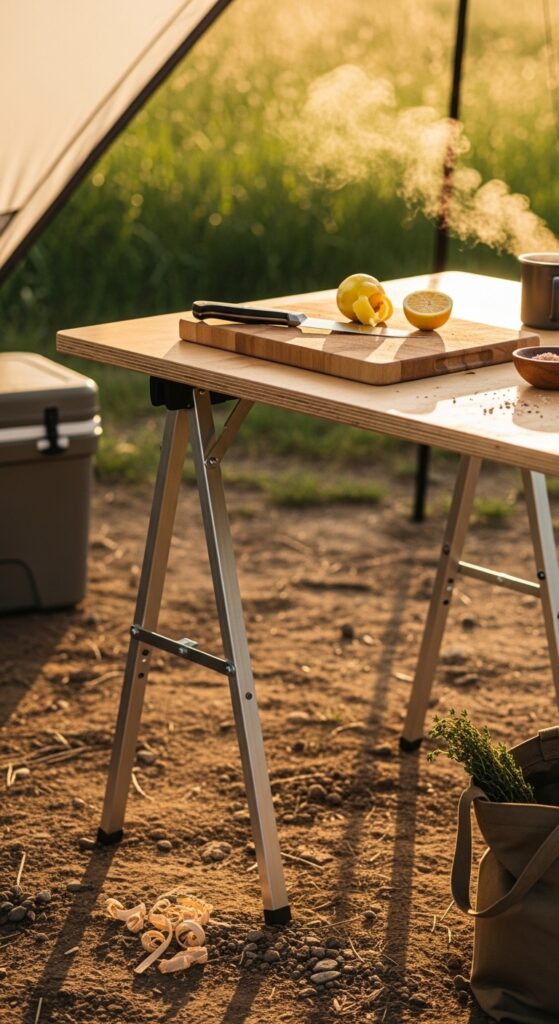
Fair warning — sawhorses on soft or uneven ground can shift, so press the legs into the dirt a bit or bring leveling shims. Wind can also be an issue with a flat top and no lip, so consider adding a thin edge rail on three sides.
The best camp table isn’t the fanciest — it’s the one that doesn’t wobble when you’re chopping.
Grab these to make your table work harder:
- Foldable Heavy-Duty Steel Sawhorse Pair — Set up a stable base for your prep surface in under a minute with legs that lock tight.
- Food-Safe Mineral Oil Wood Finish — Treat your plywood cutting surface so it repels moisture and wipes clean after every meal.
- Portable Clamp-On Table Edge Rail — Snap a low rail onto your flat surface to keep cutting boards and plates from sliding off in the wind.
5. Hanging Wash Station with Foot Pump: Hands-Free Cleanup
Mount a 5-gallon water jug on a tripod frame, attach a foot-pump dispenser at the base, and run a short hose to a small basin below. Step on the pump, water flows, and your hands stay free for scrubbing. Build the frame from 2×2 lumber tied at the top with a single bolt and wing nut.
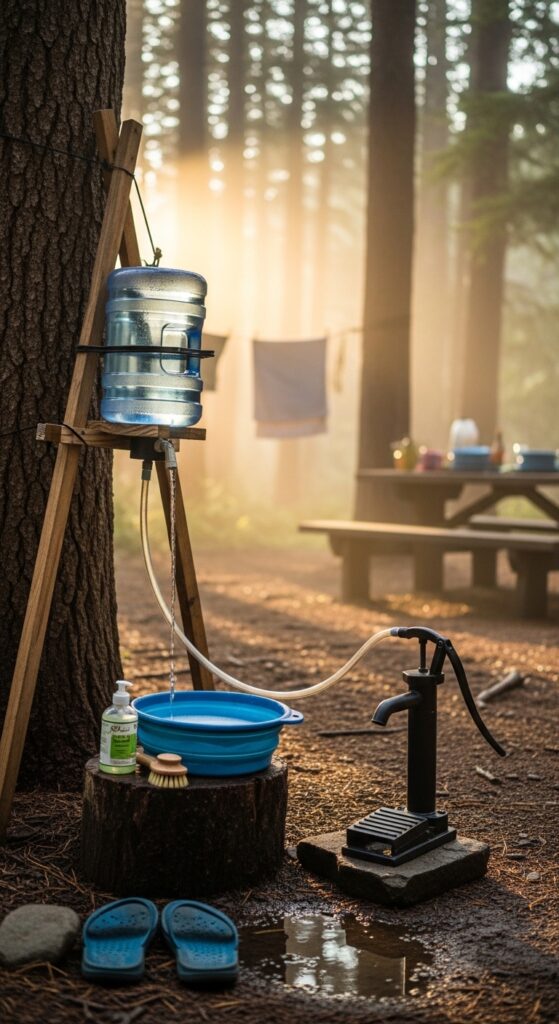
Just so you know — the foot pump loses pressure if the hose kinks, so keep the line short and straight. Also, the basin fills up faster than you’d think. Dump greywater at least 200 feet from any water source, per Leave No Trace guidelines.
A foot-pump wash station makes you feel oddly civilized in the middle of nowhere.
These make the wash station work:
- Portable Foot Pump Water Dispenser — Deliver hands-free water flow for washing dishes or rinsing produce without lifting the jug.
- Collapsible Camping Wash Basin Tub — Catch rinse water below your station and fold it flat when camp breaks down.
- Biodegradable Outdoor Camp Soap Bottle — Clean your cookware without leaving chemical traces at your campsite or in nearby waterways.
6. Magnetic Knife Strip on a Board: Safe Blade Storage Anywhere
Screw a magnetic knife strip onto a small piece of hardwood, then add a paracord loop at the top for hanging from your canopy pole or a tree branch. Blades stay secure, visible, and completely out of the food prep zone. The board protects the magnets from direct moisture contact.
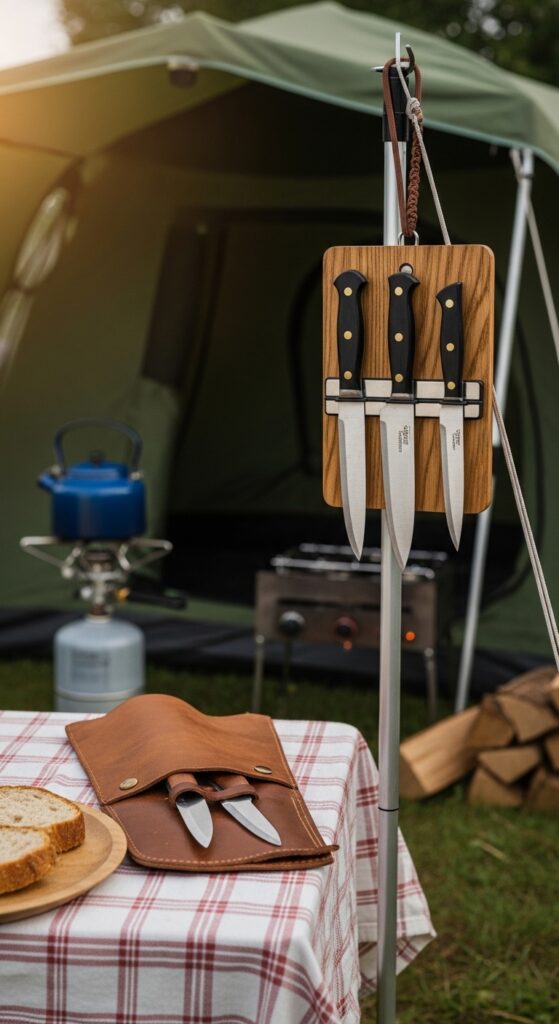
Here’s the catch — cheap magnetic strips don’t hold heavier knives well, especially with vibration during travel. Wrap each blade individually for transport and only mount them once you’re set up at camp. This is a cooking station accessory, not a travel storage solution.
Sharp knives deserve better than rattling around in a drawer — give them a proper spot.
Smart additions for this setup:
- High-Strength Magnetic Knife Strip Bar — Mount your blades safely on one strip so every knife is visible and within reach while cooking.
- Hardwood Mounting Board with Cord Loop — Hang your knife strip from any pole or branch using a simple board that protects the magnet from weather.
- Canvas Knife Roll Travel Protector — Wrap blades individually for the drive to camp so edges stay sharp and nothing gets damaged in transit.
7. Milk Crate Modular Storage System: Stack, Swap, Customize
Milk crates interlock naturally, stack without shifting, and fit perfectly in a truck bed or SUV cargo area. Label each crate by category — cookware, dry goods, cleaning supplies — and pull only what you need at camp. Zip-tie crates together for transport, then separate them on-site.
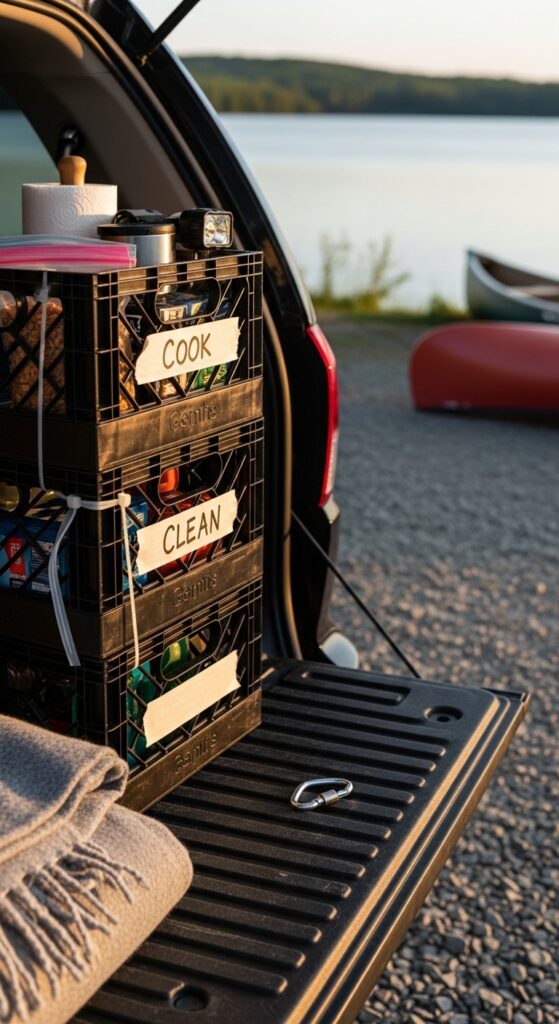
Something to keep in mind — milk crates aren’t waterproof. A surprise rain shower will soak everything inside unless you line each crate with a heavy-duty trash bag or dry sack. Also, small items fall through the grid holes, so use pouches or smaller bins inside each crate.
Modular beats fancy every time — stack what you need, leave what you don’t.
Round out this system with:
- Stackable Heavy-Duty Plastic Utility Crate — Build a customizable storage wall in your vehicle that holds cookware, food, and supplies without shifting.
- Waterproof Dry Sack Liner Bag Set — Drop a liner into each crate so rain and splashes never reach your dry goods or utensils.
- Clip-On Label Tag Holder Multipack — Snap category labels onto each crate so anyone in the group can find what they need without unpacking everything.
8. Two-Burner Stove Windscreen from Sheet Metal: Cook in Any Breeze
Bend a piece of aluminum sheet metal into a three-sided windscreen that wraps around your camp stove. Add fold lines every 8 inches so it collapses flat for storage. This simple DIY camp kitchen idea cuts cooking time by keeping flames steady and heat focused on the pot, not blowing sideways.
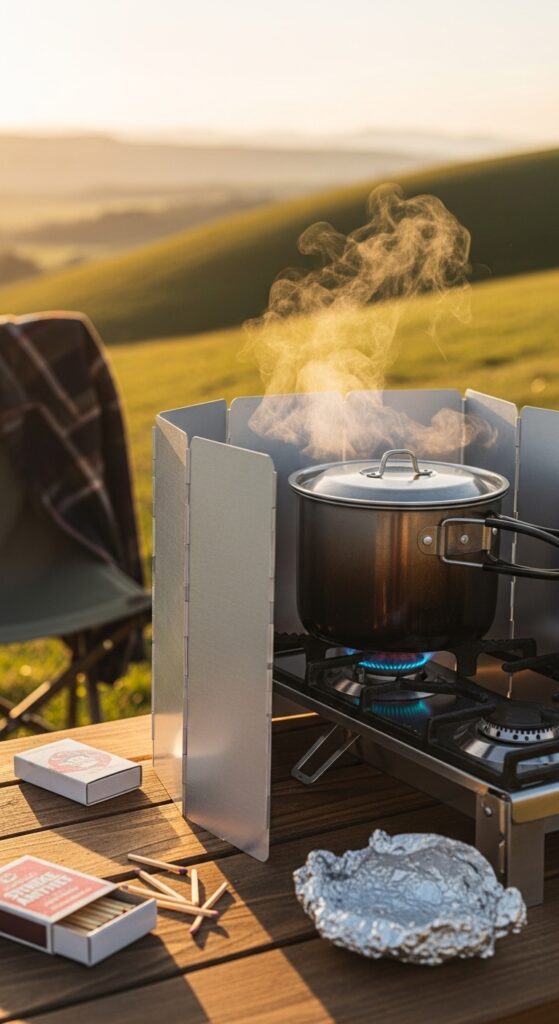
Heads up — aluminum conducts heat fast, so the screen gets hot during cooking. Don’t touch it barehanded and keep it away from anything meltable like plastic tablecloths. Also, leave a gap at the bottom for airflow so your stove’s fuel burns cleanly.
Wind is the invisible enemy of camp cooking — a $5 sheet of metal solves it permanently.
These help you build and use it safely:
- Bendable Aluminum Sheet Metal Panel — Cut and fold a custom windscreen that fits your exact stove width and collapses flat for transport.
- Heat-Resistant Work Gloves Leather Pair — Handle your hot windscreen and cookware safely with gloves that grip even when things get greasy.
- Compact Folding Metal Shears Tool — Cut your sheet metal to size on-site without hauling a full toolbox to the campground.
9. Tiered Hanging Basket Pantry: Vertical Storage from One Hook
Clip a three-tier hanging fruit basket to your canopy frame or a sturdy branch, and suddenly you’ve got an entire pantry using zero table space. Top tier for bread and snacks, middle for fruits and vegetables, bottom for condiments and napkins. It swings gently in the breeze and looks surprisingly charming.

Real talk — squirrels and raccoons love a hanging pantry. If you’re in critter-heavy areas, transfer food into sealed containers before loading the baskets, or bring the whole thing into your vehicle at night. Also, heavy cans will stretch the baskets out of shape over time.
Going vertical is the smartest move in a small campsite — your table space is sacred.
Set up your hanging pantry with:
- Three-Tier Wire Hanging Basket Set — Clip a full pantry system to any overhead bar or branch and reclaim every inch of counter space.
- Twist-Lock Airtight Food Storage Containers — Seal snacks and dry goods inside critter-proof containers that stack inside the baskets without tipping.
- Heavy-Duty Carabiner Hook Clip Pack — Attach your basket set securely to canopy frames, tree limbs, or truck racks with clips rated for real weight.

10. Pallet Wood Camp Bar Cart: Rustic Drinks Station
Break down a shipping pallet, cut the planks to matching lengths, and build a two-shelf rolling cart using caster wheels from the hardware store. Top shelf holds your coffee setup or cocktail supplies, bottom shelf stores cups, filters, and extras. Sand it smooth, stain it dark walnut, and it actually looks intentional.
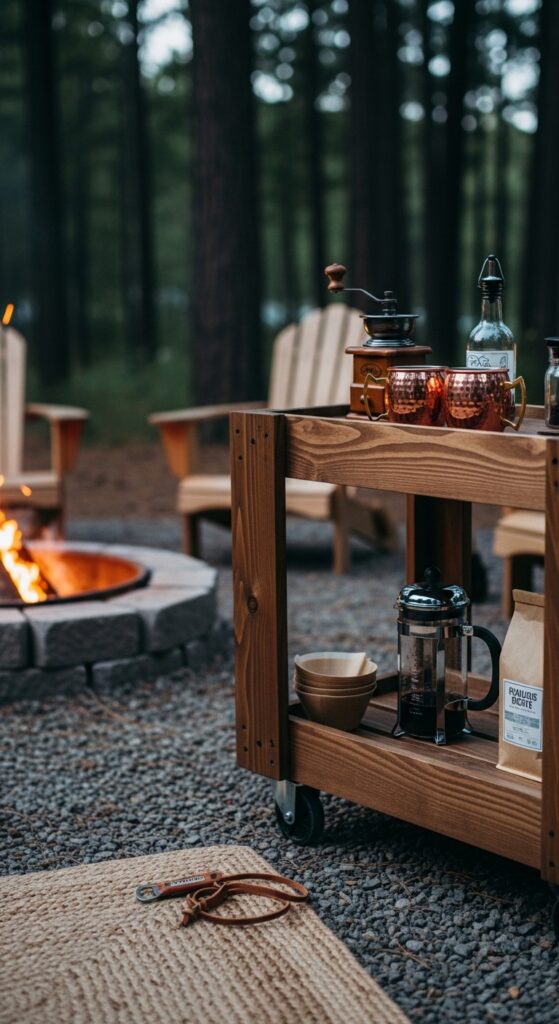
Here’s the thing — pallet wood often contains moisture, chemicals, or splinters. Look for pallets stamped “HT” (heat treated) rather than “MB” (methyl bromide treated). Sand thoroughly and seal all surfaces before any food or drinks go near it.
A dedicated drinks station at camp earns you permanent host status with every group you invite.
Pull together a solid build with:
- Locking Swivel Caster Wheel Set — Roll your bar cart across uneven ground and lock it in place once you’ve found the perfect shady spot.
- Dark Walnut Wood Stain Finish Can — Give raw pallet wood a rich, finished look that hides imperfections and resists outdoor moisture.
- Outdoor Silicone Cup Sleeve Multipack — Slide color-coded sleeves onto everyone’s cup so drinks stop getting mixed up around the fire.
11. Pegboard Tool Wall Behind the Tailgate: Instant Kitchen Backdrop
Mount a piece of pegboard to a simple 2×2 frame that leans against or hooks onto your open tailgate. Hang hooks, baskets, and small shelves to keep every tool organized and visible behind your cooking zone. It stands upright during cooking and lays flat in the truck bed for the drive.
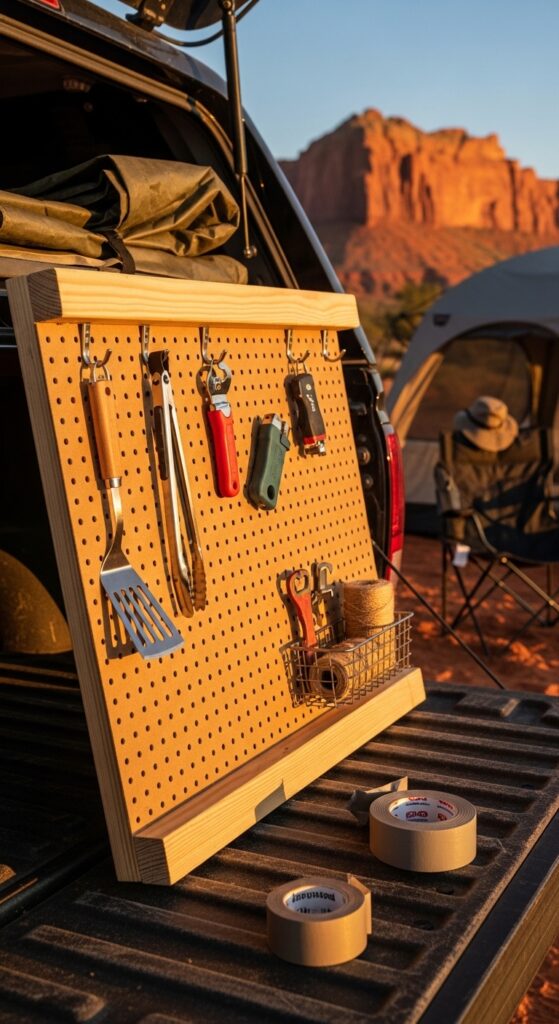
Just keep in mind — pegboard isn’t waterproof, so seal it with a spray-on polyurethane coat before your first trip. The frame also needs rubber feet or non-slip pads on the bottom, or it’ll slowly slide away from the tailgate as you grab tools off it.
When everything you need is hanging right in front of you, cooking stops feeling like a scavenger hunt.
Get the wall set up with:
- Pre-Cut Pegboard Panel Standard Size — Mount a ready-to-go tool wall that accepts every standard hook and basket without drilling extra holes.
- Assorted Pegboard Hook Accessory Kit — Mix and match hooks, bins, and small shelves so every utensil and gadget has a designated spot.
- Clear Spray Polyurethane Sealant Can — Waterproof your pegboard with a quick spray coat that dries fast and protects against dew and rain splash.
12. Dutch Oven Table from Cinder Blocks: Fireproof and Free-Standing
Stack four cinder blocks into a low square platform, set a metal grate across the top, and you’ve got a dedicated Dutch oven station that keeps hot coals organized and off the bare ground. The blocks absorb and radiate heat evenly, and the whole setup costs almost nothing.
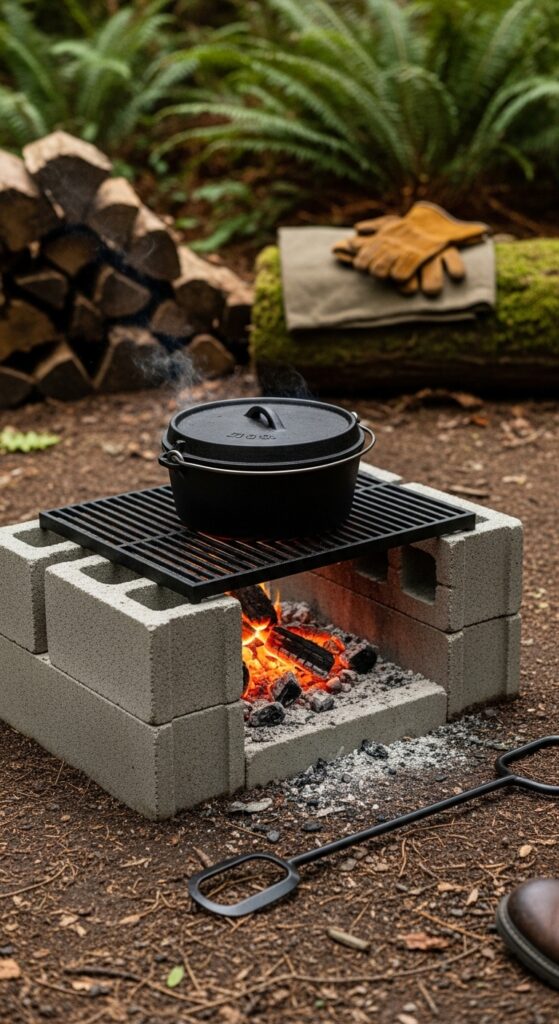
Be honest with yourself — cinder blocks are heavy and not exactly packable. This works best at a semi-permanent campsite, a cabin, or a spot you return to regularly. Don’t plan on hauling eight cinder blocks on a weekend backpacking trip.
A proper Dutch oven station changes how you cook at camp — low, slow, and completely controlled.
Make the station fully functional with:
- Sturdy Cast Iron Cooking Grate Rack — Bridge your cinder block base with a grate that holds Dutch ovens, kettles, and skillets directly over coals.
- Long-Handle Cast Iron Lid Lifter — Check your Dutch oven without burning your hands or dropping ash into your cobbler every single time.
- Heat-Resistant Charcoal Chimney Starter — Get coals glowing evenly before transferring them under your oven so cooking starts fast and stays consistent.
13. Bungee Cord Drying Rack Between Trees: Air-Dry Everything Fast
Run two bungee cords between trees at different heights and clip freshly washed dishes, cups, and utensils with clothespins or binder clips. The natural tension keeps items secure, airflow dries everything quickly, and you haven’t wasted a single inch of table space.
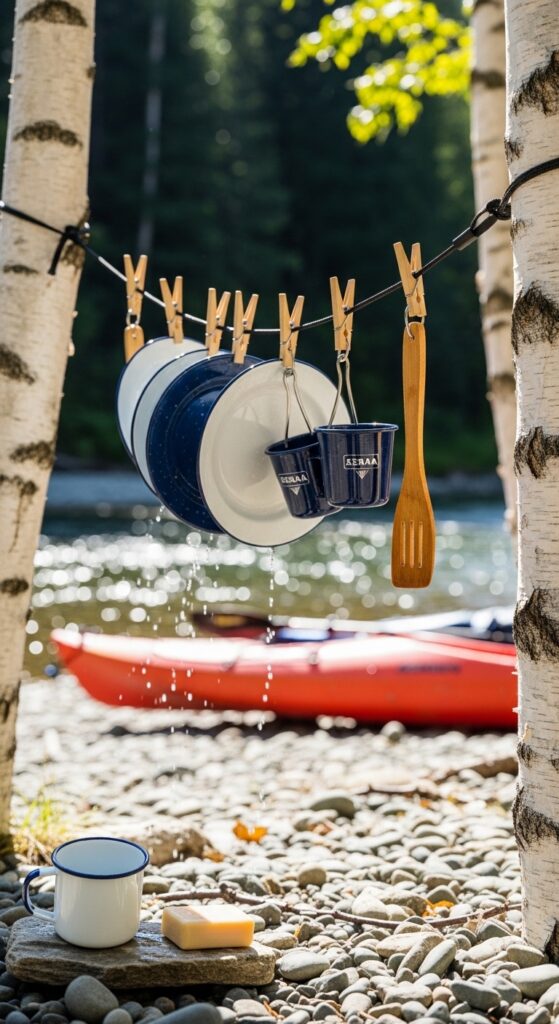
Worth noting — bungee cords lose elasticity over time, especially in UV exposure. Check the tension each trip and replace any cord that feels loose or has visible cracking. Also, angle the cords slightly downhill so water drips off the low end instead of pooling on your dishes.
The fastest way to dry camp dishes is the simplest — stretch a line and let the air work.
Set up a proper drying line with:
- Adjustable Bungee Cord Heavy-Duty Pack — String a flexible drying line between any two anchor points that stays taut through wind and weight.
- Stainless Steel Spring Clothespin Set — Clip dishes and utensils securely onto the line with pins that grip without rusting or snapping.
- Mesh Hanging Dry Bag Organizer — Add a hanging mesh pouch below the line to catch smaller items like silverware that can’t be clipped.
14. Solar Shower Bag as a Hot Water Source: Warm Water All Day
Hang a black solar shower bag in direct sunlight for two hours, and you’ve got heated water for washing dishes, rinsing produce, and cleaning hands — no stove required. Run the hose to your wash station or just use the gravity-fed flow directly over your dish basin.
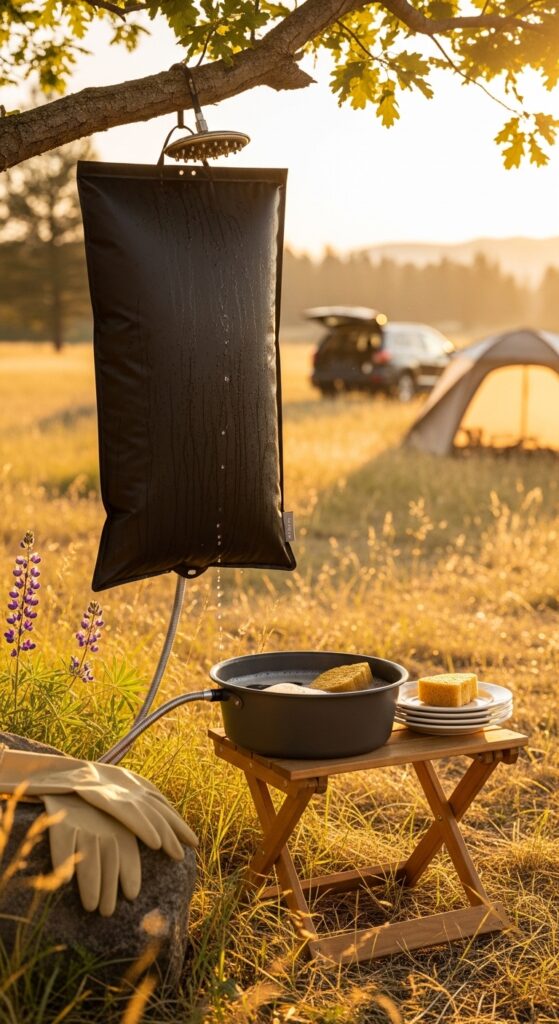
Honestly — solar bags work great in full sun but barely warm the water on cloudy days or under tree cover. Position the bag on a south-facing surface or your vehicle’s roof for the best heat absorption. And don’t expect scalding hot — it’s comfortably warm at best.
Free hot water from sunlight alone — that’s the kind of DIY camp kitchen ideas that changes everything.
These make the most of your solar setup:
- Portable Solar Shower Heating Bag — Hang this bag in the sun and have warm water ready for dishes and handwashing without burning any fuel.
- Flexible Gravity-Fed Hose Nozzle Attachment — Direct warm water exactly where you need it with a nozzle that controls flow from gentle rinse to full stream.
- Quick-Dry Microfiber Camp Towel Large — Wipe down dishes and hands with a towel that absorbs fast and dries in half the time of cotton.
15. Flip-Top Trash and Recycling Bin from a 5-Gallon Bucket: Tidy Camp, Always
Cut a swinging flap into the lid of a 5-gallon bucket, line it with a trash bag, and you’ve got a critter-resistant, tip-proof waste bin that keeps your camp kitchen spotless. Make two — one for trash, one for recycling — and label them with spray paint stencils.

Just remember — 5-gallon buckets fill up fast with a group. Bring extra trash bags and plan to compact waste or take out bags more often than you’d expect. The flip-top lid also works better if you sand the cut edges smooth so the flap swings freely.
A clean campsite starts with a proper trash setup — and this one costs about three dollars.
Keep your site clean with:
- Food-Grade Five-Gallon Bucket with Lid — Repurpose a sturdy bucket into a compact trash or recycling bin that seals out smells and critters.
- Reusable Heavy-Duty Trash Bag Liners — Line your bucket with a thick bag that holds up against sharp cans and wet food waste.
- Adhesive Vinyl Label Stencil Sheet Set — Spray-paint clean labels onto each bucket so your group knows exactly where trash and recycling go.
16. Condiment Caddy from a Six-Pack Carrier: Grab-and-Go Flavor Kit
Drop your hot sauce, olive oil, salt, pepper, and a few key sauces into a wooden or cardboard six-pack beer carrier. The handle makes it easy to carry from the vehicle to the table and back, and the divided slots keep bottles upright and separated. Wrap bottles with rubber bands for extra grip.
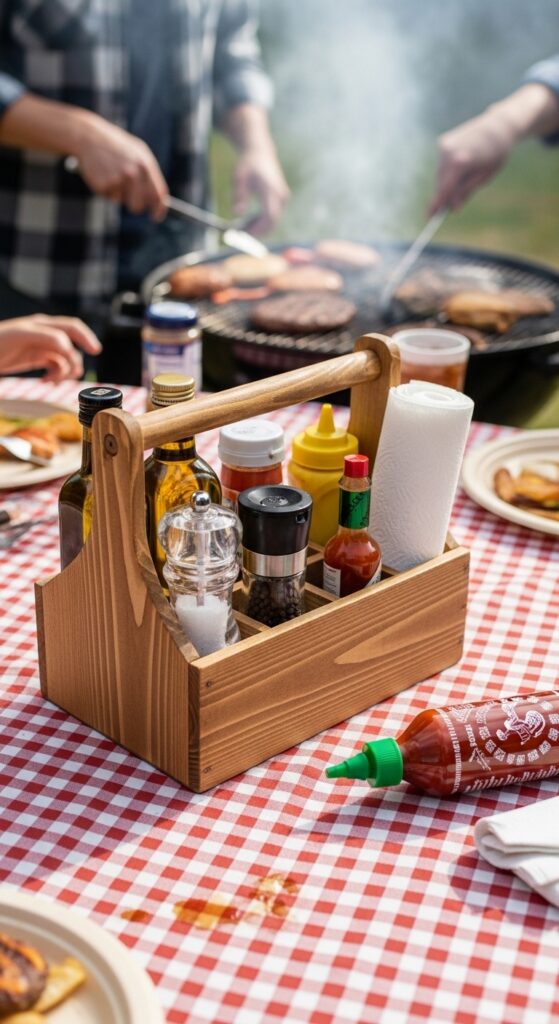
One small issue — cardboard carriers fall apart when wet. If you want this to last more than one trip, use a wooden carrier or coat a cardboard one with several layers of clear packing tape on all sides. It’s not pretty, but it’s waterproof.
The best camp meals aren’t about the main dish — they’re about what you put on top of it.
Build your flavor kit with:
- Wooden Six-Pack Bottle Carrier Caddy — Grab your entire condiment collection by one handle and bring it from truck to table in a single trip.
- Mini Squeeze Bottle Travel Set — Fill small bottles with oils, sauces, and dressings so you’re not hauling full-size containers to camp.
- Weatherproof Chalkboard Label Sticker Pack — Mark each bottle clearly so nobody grabs the fish sauce when they wanted the soy sauce.
17. Nesting Cook Kit in an Ammo Can: Bombproof and Organized
An old metal ammo can fits a compact nesting cook set, fire starters, a lighter, and a small cutting board inside one sealed, waterproof, stackable box. The rubber gasket keeps everything bone dry, and the steel construction survives being tossed around in a truck bed for years.
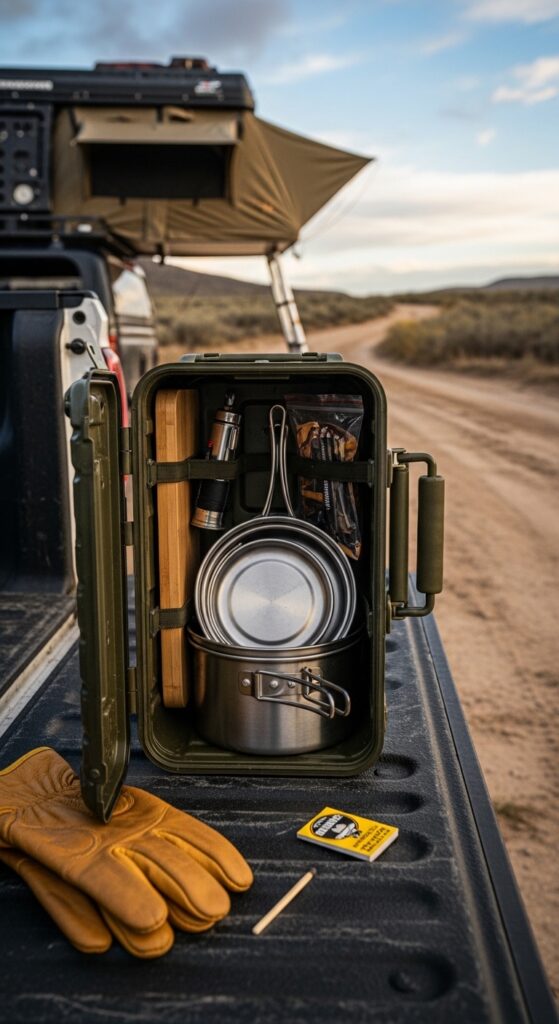
Reality check — ammo cans are heavy even when empty. This isn’t ideal for weight-sensitive setups or anyone hiking to their campsite. It shines for overlanding, car camping, and truck-bed setups where durability matters more than ounces.
An ammo can is the toughest DIY camp kitchen storage box that already exists — just fill it.
Load yours up with:
- Compact Nesting Stainless Cook Set — Fit a full pot, pan, and lid set into one tight stack that drops right into your ammo can.
- Waterproof Metal Ammo Can Storage Box — Seal your cook kit inside a crushproof, waterproof container that handles years of rough transport without failing.
- Compact Folding Bamboo Cutting Board — Slide a thin, foldable cutting surface into the can so you always have a clean prep spot ready.
18. Rope and Branch Overhead Pot Rack: Rustic and Instantly Useful
Find a strong dead branch about three feet long, tie ropes at both ends, and hang it horizontally from your canopy frame or between two trees. Use S-hooks to hang pots, pans, mugs, and lanterns from the branch. It frees up your table and looks incredible in camp photos.
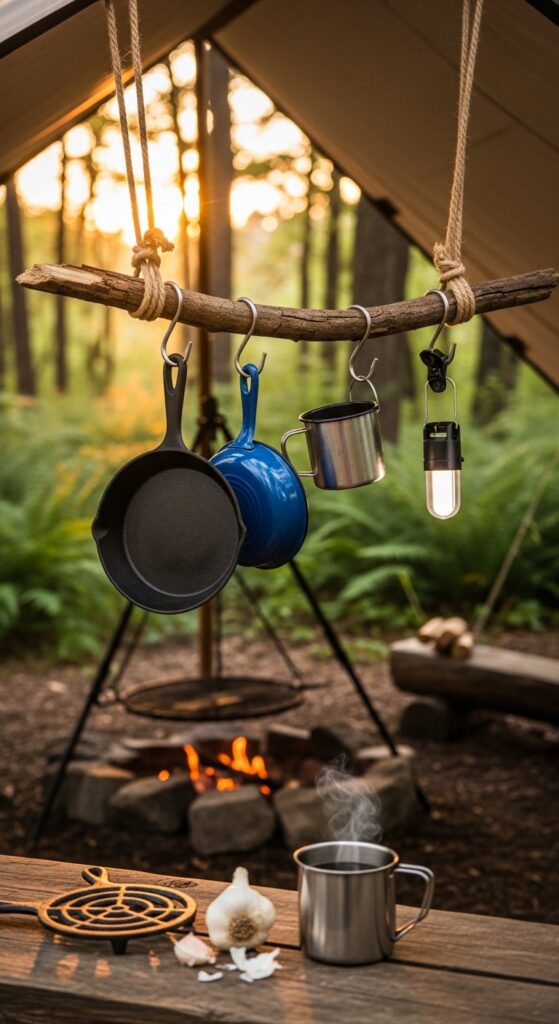
Quick reality check — make sure the branch is actually dead and dry, not just leafless. A green branch bows under weight and can snap unexpectedly. Test it with your heaviest pot before hanging your whole collection. And check the rope knots twice.
Sometimes the best camp kitchen upgrades come straight from the woods around you.
Hang your setup with:
- Natural Jute Rope Heavy-Weight Spool — Tie a rustic overhead line that holds real weight and looks like it belongs at camp.
- Stainless Steel S-Hook Large Size Pack — Hang pots, pans, and mugs from any branch or bar with hooks that slide on and off easily.
- Compact LED Clip-On Lantern Light — Hook a small lantern onto your pot rack to light up the cooking area after sunset without taking up table space.
19. Roll-Up Tool Wrap from Canvas: The Grab-and-Go Utensil Kit
Sew or rivet pockets into a rectangle of heavy canvas, slot in your spatula, tongs, knife, can opener, and lighter, then roll the whole thing up and tie it with a leather cord. It hangs from a nail, tucks into any gap in your gear, and protects every tool from scratching against each other.
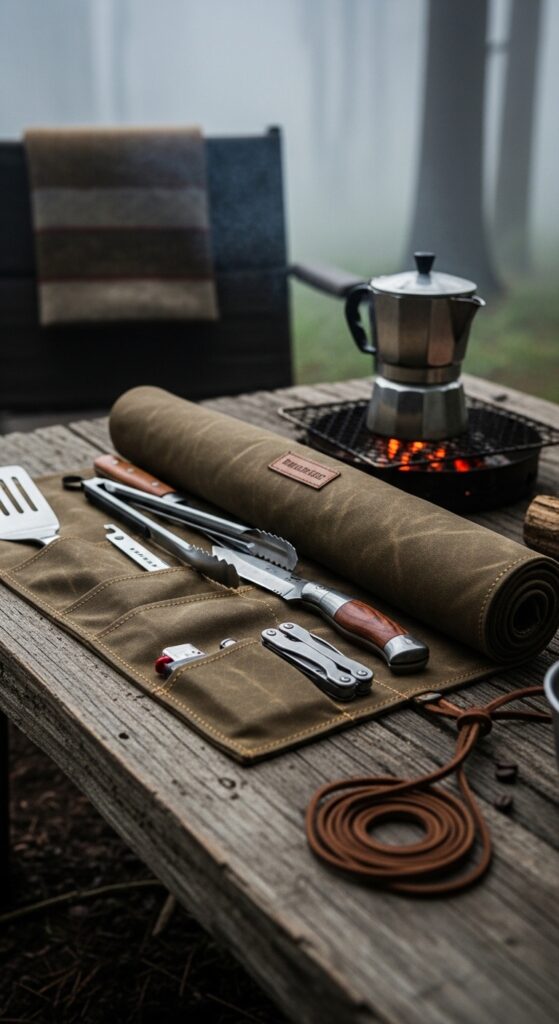
Practical note — canvas absorbs moisture and can mildew if you roll it up while damp. Always air-dry the wrap completely before packing it away, or use waxed canvas for built-in water resistance. Add a small pocket for a fire starter and you’ve got your most essential kit in one roll.
One roll, every tool, zero digging through bins — that’s how a camp kitchen should start.
Finish your roll-up kit with:
- Pre-Waxed Canvas Fabric Utility Sheet — Cut and fold a naturally water-resistant wrap that protects your tools and lasts for hundreds of trips.
- Leather Cord Wrap Tie Closure Strip — Secure your rolled tool wrap with a cord that cinches tight, looks sharp, and gets better with age.
- Compact Multi-Tool Stainless Steel Utensil — Slide one versatile tool into the last pocket so you’ve always got a backup for anything you forgot.
InsideMake exists for one reason — to help you love your home more. We bring expert decor insights and room-specific inspiration directly to you.